Dial Status Reporting Using Node.js

Overview

Plivo passes the call status of an ongoing call so you can decide how to process it. For all the calls made using Plivo’s Make a Call API or Dial XML, Plivo sends the call status to the application server at different stages of a call. We send call status as an HTTP webhook request to URLs such as ring_url, answer_url, fallback_url, action_url, callback_url, and hangup_url.

In each callback, the CallStatus parameter takes one of these values:

in-progress

The call was answered and is in progress. Calls with this status can be terminated using the Hangup API.

completed

The call was completed, terminated either by the Hangup API or by one of the parties in the call.

ringing

The call is ringing. This status is sent to the Ring URL.

no-answer

The call was not answered.

busy

The called line is busy.

cancel

The call was canceled by the caller.

timeout

There was a timeout while connecting your call, caused by either an issue with one of the terminating carriers or network lag in our system.

Plivo sends these parameters to the application server in the webhook:

Parameter Description
DialRingStatus Indicates whether the dial attempt rang or not. Values: true, false
DialHangupCause The standard telephony hangup cause.
DialStatus Status of the dial. Values: completed, busy, failed, timeout, no-answer
DialALegUUID CallUUID of the A leg.
DialBLegUUID CallUUID of the B leg. Empty if nobody answers.

You can implement dial status reporting either by using our PHLO visual workflow builder or our APIs and XML documents. Follow the instructions in one of the tabs below.

You can create and deploy a PHLO to handle dial status reporting with a few clicks on the PHLO canvas, without writing a single line of code.

How it works

Screen Incoming Calls Call Flow

Prerequisites

To get started, you need a Plivo account — sign up with your work email address if you don’t have one already. To receive incoming calls, you must have a voice-enabled Plivo phone number. You can rent numbers from the Numbers page of the Plivo console, or by using the Numbers API.

Create the PHLO

To create a PHLO, visit the PHLO page of the Plivo console. If this is your first PHLO, the PHLO page will be empty.

Create the PHLO to Block calls from a specific number

  • Click Create New PHLO.
  • In the Choose your use case pop-up, click Build my own. The PHLO canvas will appear with the Start node.
    Note: The Start node is the starting point of any PHLO. It lets you trigger a PHLO to start upon one of three actions: incoming SMS message, incoming call, or API request.
  • From the list of components on the left side, drag and drop the Call Forward component onto the canvas. When a component is placed on the canvas it becomes a node.
  • Draw a line to connect the Start node’s Incoming Call trigger state to the Call Forward node.
  • In the configuration panel for the Call Forward node, enter the caller ID variable {{Start.call.from}} in the From field. Enter any numbers you want to call in the To field, separated by commas.
  • Once you’ve configured the node, click Validate to save the configuration.
  • Next, from the list of components, drag and drop the HTTP Request component onto the canvas.
  • Draw lines to connect all of the dial status states of the Call Forward node (Completed, No Answer, Busy/Rejected, Failed) with the HTTP Request node.
  • Configure the HTTP Request node. Enter your application server URL in the box next to the HTTP Method (GET/POST) field.
  • Provide key:value pairs of the callback attributes you’re interested in, such as DialRingStatus, DialHangupCause, DialStatus, DialALegUUID, and DialBLegUUID.
  • Give the PHLO a name by clicking in the upper left, then click Save.

Assign the PHLO to a Plivo number

Once you’ve created and configured your PHLO, assign it to a Plivo number.

Configure the PHLO to your Plivo Number

  • On the Numbers page of the console, under Your Numbers, click the phone number you want to use for the PHLO.
  • In the Number Configuration box, select PHLO from the Application Type drop-down.
  • From the PHLO Name drop-down, select the PHLO you want to use with the number, then click Update Number.

Test

You can now make a call to your Plivo phone number. After the call ends, Plivo reports back the status via the key:value pairs you specified to the URL you specified.

For more information about creating a PHLO app, see the PHLO User Guide.For more information about creating a PHLO application, see the PHLO Getting Started guide. For information on components and their variables, see the PHLO Components Library.

Here’s how to use Plivo APIs and XML to send callback events for dial status reporting.
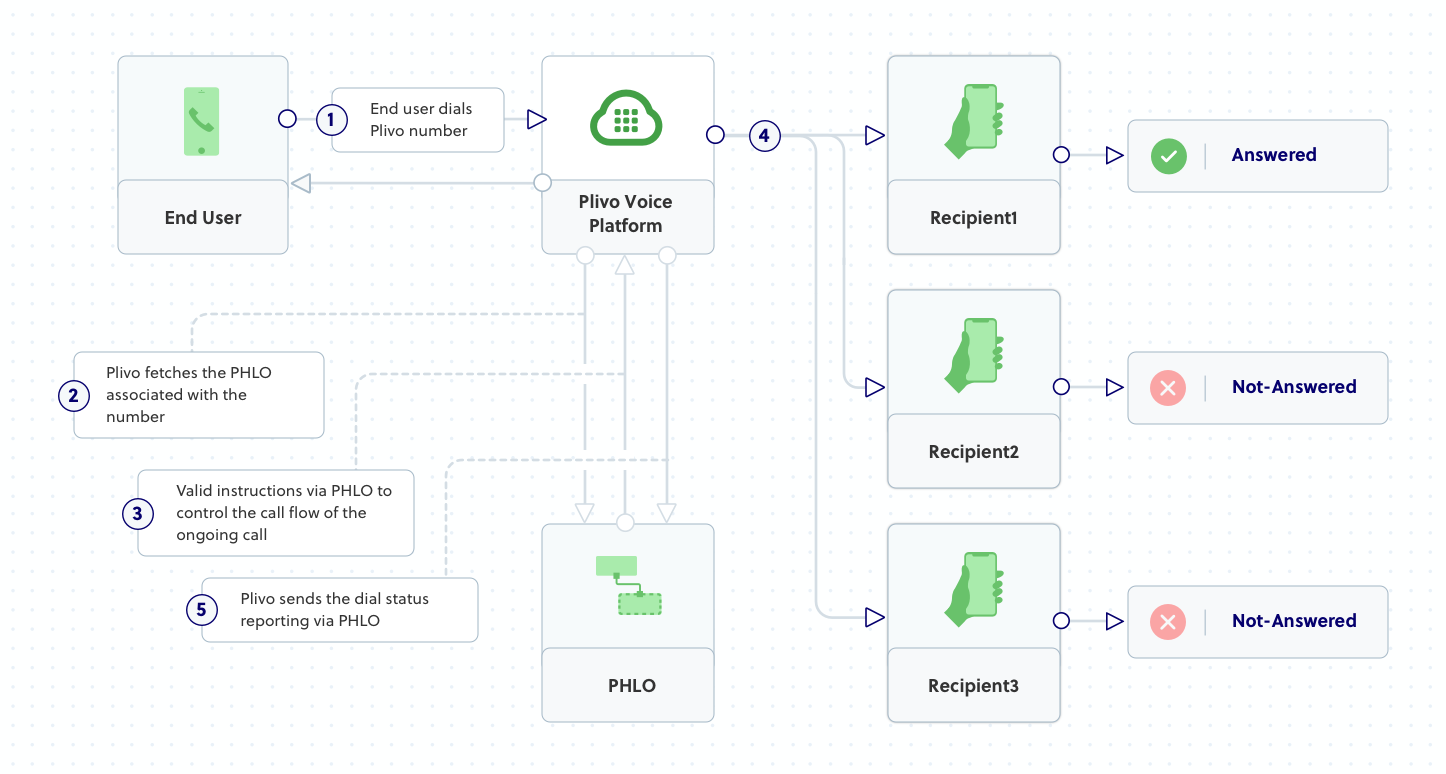
How it works

Outbound Call Flow

Plivo requests an answer URL when a Plivo number receives a call (step 2) and expects the file at that URL to be configured in the application assigned to the number to hold a valid XML response with instructions on how to handle the call. For outbound calls you specify an answer URL along with the make call API request, and for incoming calls the answer URL is specified in the Plivo application associated with the phone number.

In addition to requests to the answer URL, Plivo initiates HTTP requests to your application server throughout the course of a call based on specific XML elements and attributes in your answer XML document (step 5). Such requests are broadly classified into two categories:

Action URL requests: These requests are typically invoked at the end of an XML element’s execution, and the server expects XML instructions to carry forward the call in response to these requests. This happens, for example, when a caller provides Touch-Tone input during GetInput XML execution.

Callback URL requests: These requests serve as webhooks to pass the application server information about events through the course of an XML element’s execution, such as when a conference participant is muted or unmuted. These callback URL requests can be used for dial status reporting. No XML instructions are expected in response to these requests.

Prerequisites

To get started, you need a Plivo account — sign up with your work email address if you don’t have one already. You must have a voice-enabled Plivo phone number to receive incoming calls; you can rent numbers from the Numbers page of the Plivo console, or by using the Numbers API. If this is your first time using Plivo APIs, follow our instructions to set up a Node.js development environment and a web server and safely expose that server to the internet.

Create an Express server for dial status reporting

Create a file called dial_status.js and paste into it this code.

1
2
3
4
5
6
7
8
9
10
11
12
13
14
15
16
17
18
19
20
21
22
23
24
25
26
27
28
29
30
31
32
33
34
35
var plivo = require('plivo');
var express = require('express');
var app = express();

app.set('port', (process.env.PORT || 5000));
app.use(express.static(__dirname + '/public'));

app.all('/dialstatus/', function(request, response) {
    var r = plivo.Response();
    var params = {
        'action': "https://<yourdomain>.com/dialstatus/action/",
        'method': "POST",
        'redirect': "true"
    };
    var dial = r.addDial(params);
    var first_number = "<phone_number>";
    dial.addNumber(first_number);
    console.log (r.toXML());
    response.set({
        'Content-Type': 'text/xml'
    });
    response.end(r.toXML());
});

app.all('/dialstatus/action/', function(request, response) {
    var status = request.param('Status');
    var aleg = request.param('DialALegUUID');
    var bleg = request.param('DialBLegUUID');

    console.log ('Status : ' + status + ' Aleg UUID  : ' + aleg + ' Bleg UUID : ' + bleg);
});

app.listen(app.get('port'), function() {
    console.log('Node app is running on port', app.get('port'));
});

Replace the phone number placeholder with an actual phone number in E.164 format (for example, +12025551234).

In this code, we tell Plivo to POST the call status to https://<yourdomain>.com/dialstatus/. We set the redirect attribute, which determines whether to change the call flow of an ongoing call based on the actions performed, to true, which tells Plivo to expect a valid XML document to be posted to https://<yourdomain>.com/dialstatus/action. The code creates an XML document with a Dial XML element.

Create a Plivo application for dial status reporting

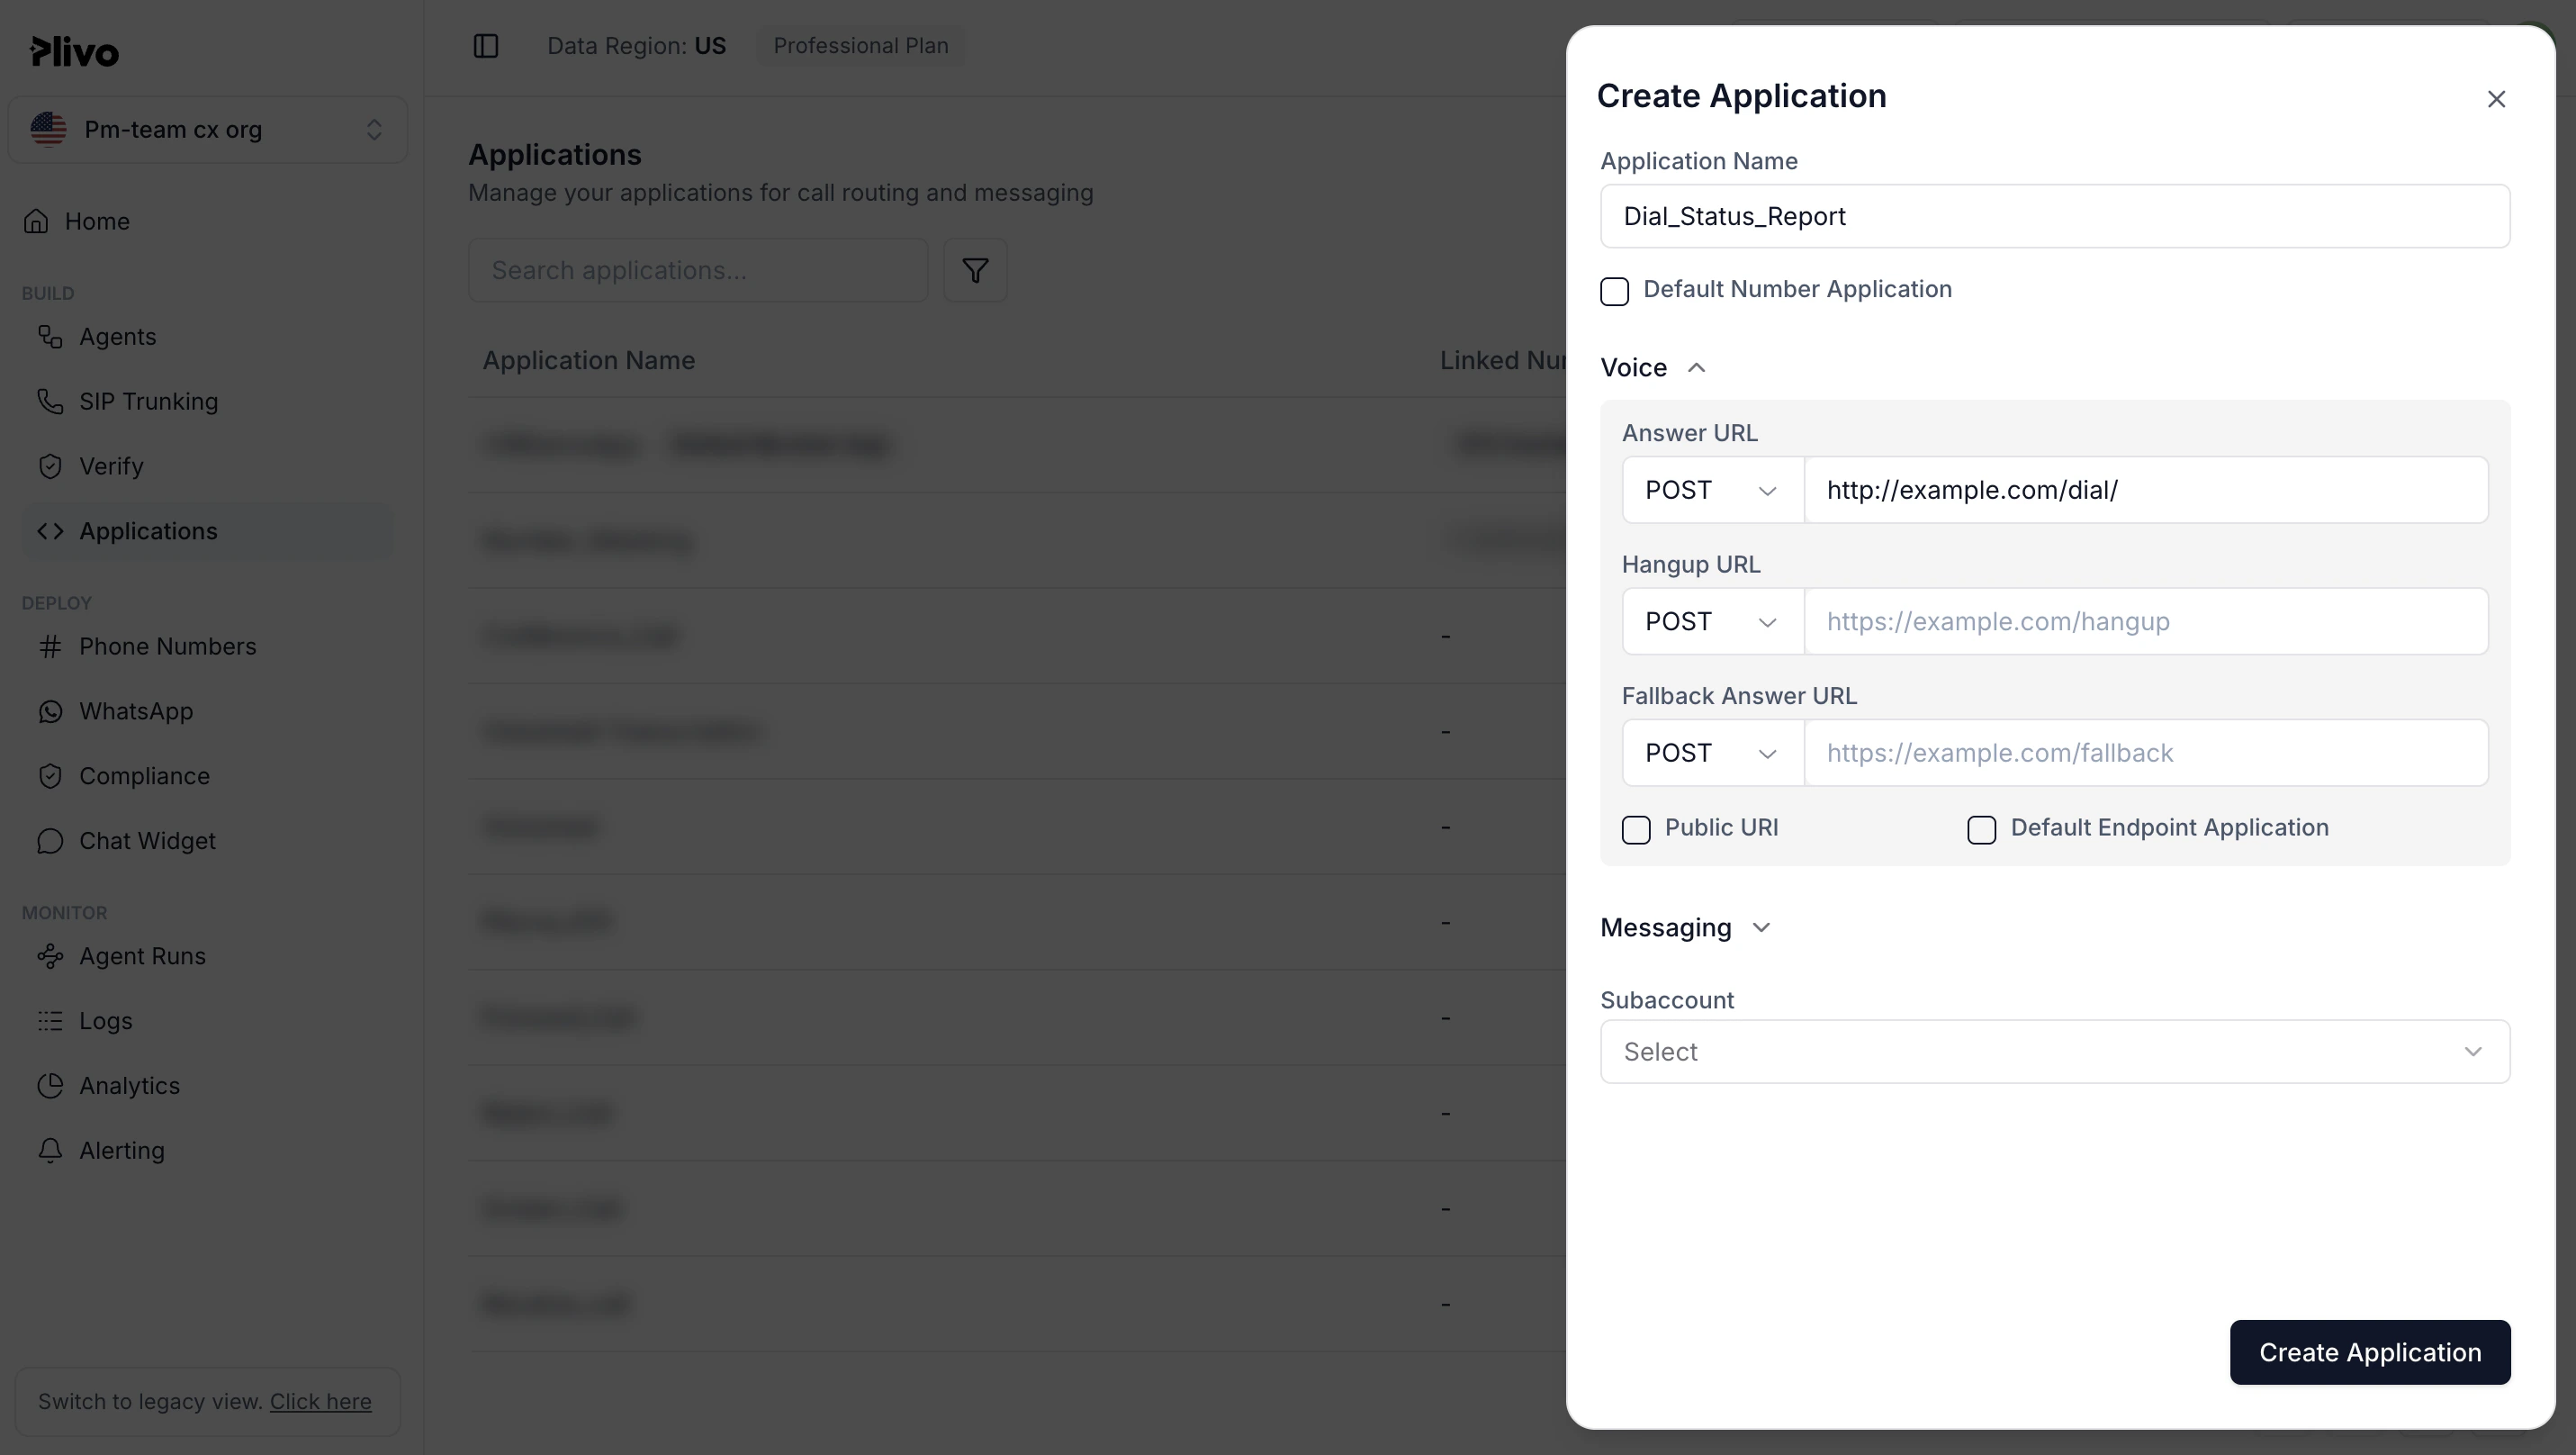
Associate the Express server you created with Plivo by creating a Plivo application. Visit Voice > Applications in the Plivo console and click on Add New Application, or use Plivo’s Application API.

Give your application a name — we called ours Dial Status Report. Enter the server URL you want to use (for example https://<yourdomain>.com/dialstatus/) in the Answer URL field and set the method to POST. Click on Create Application to save your application.

Create dial status application

Assign a Plivo number to your application

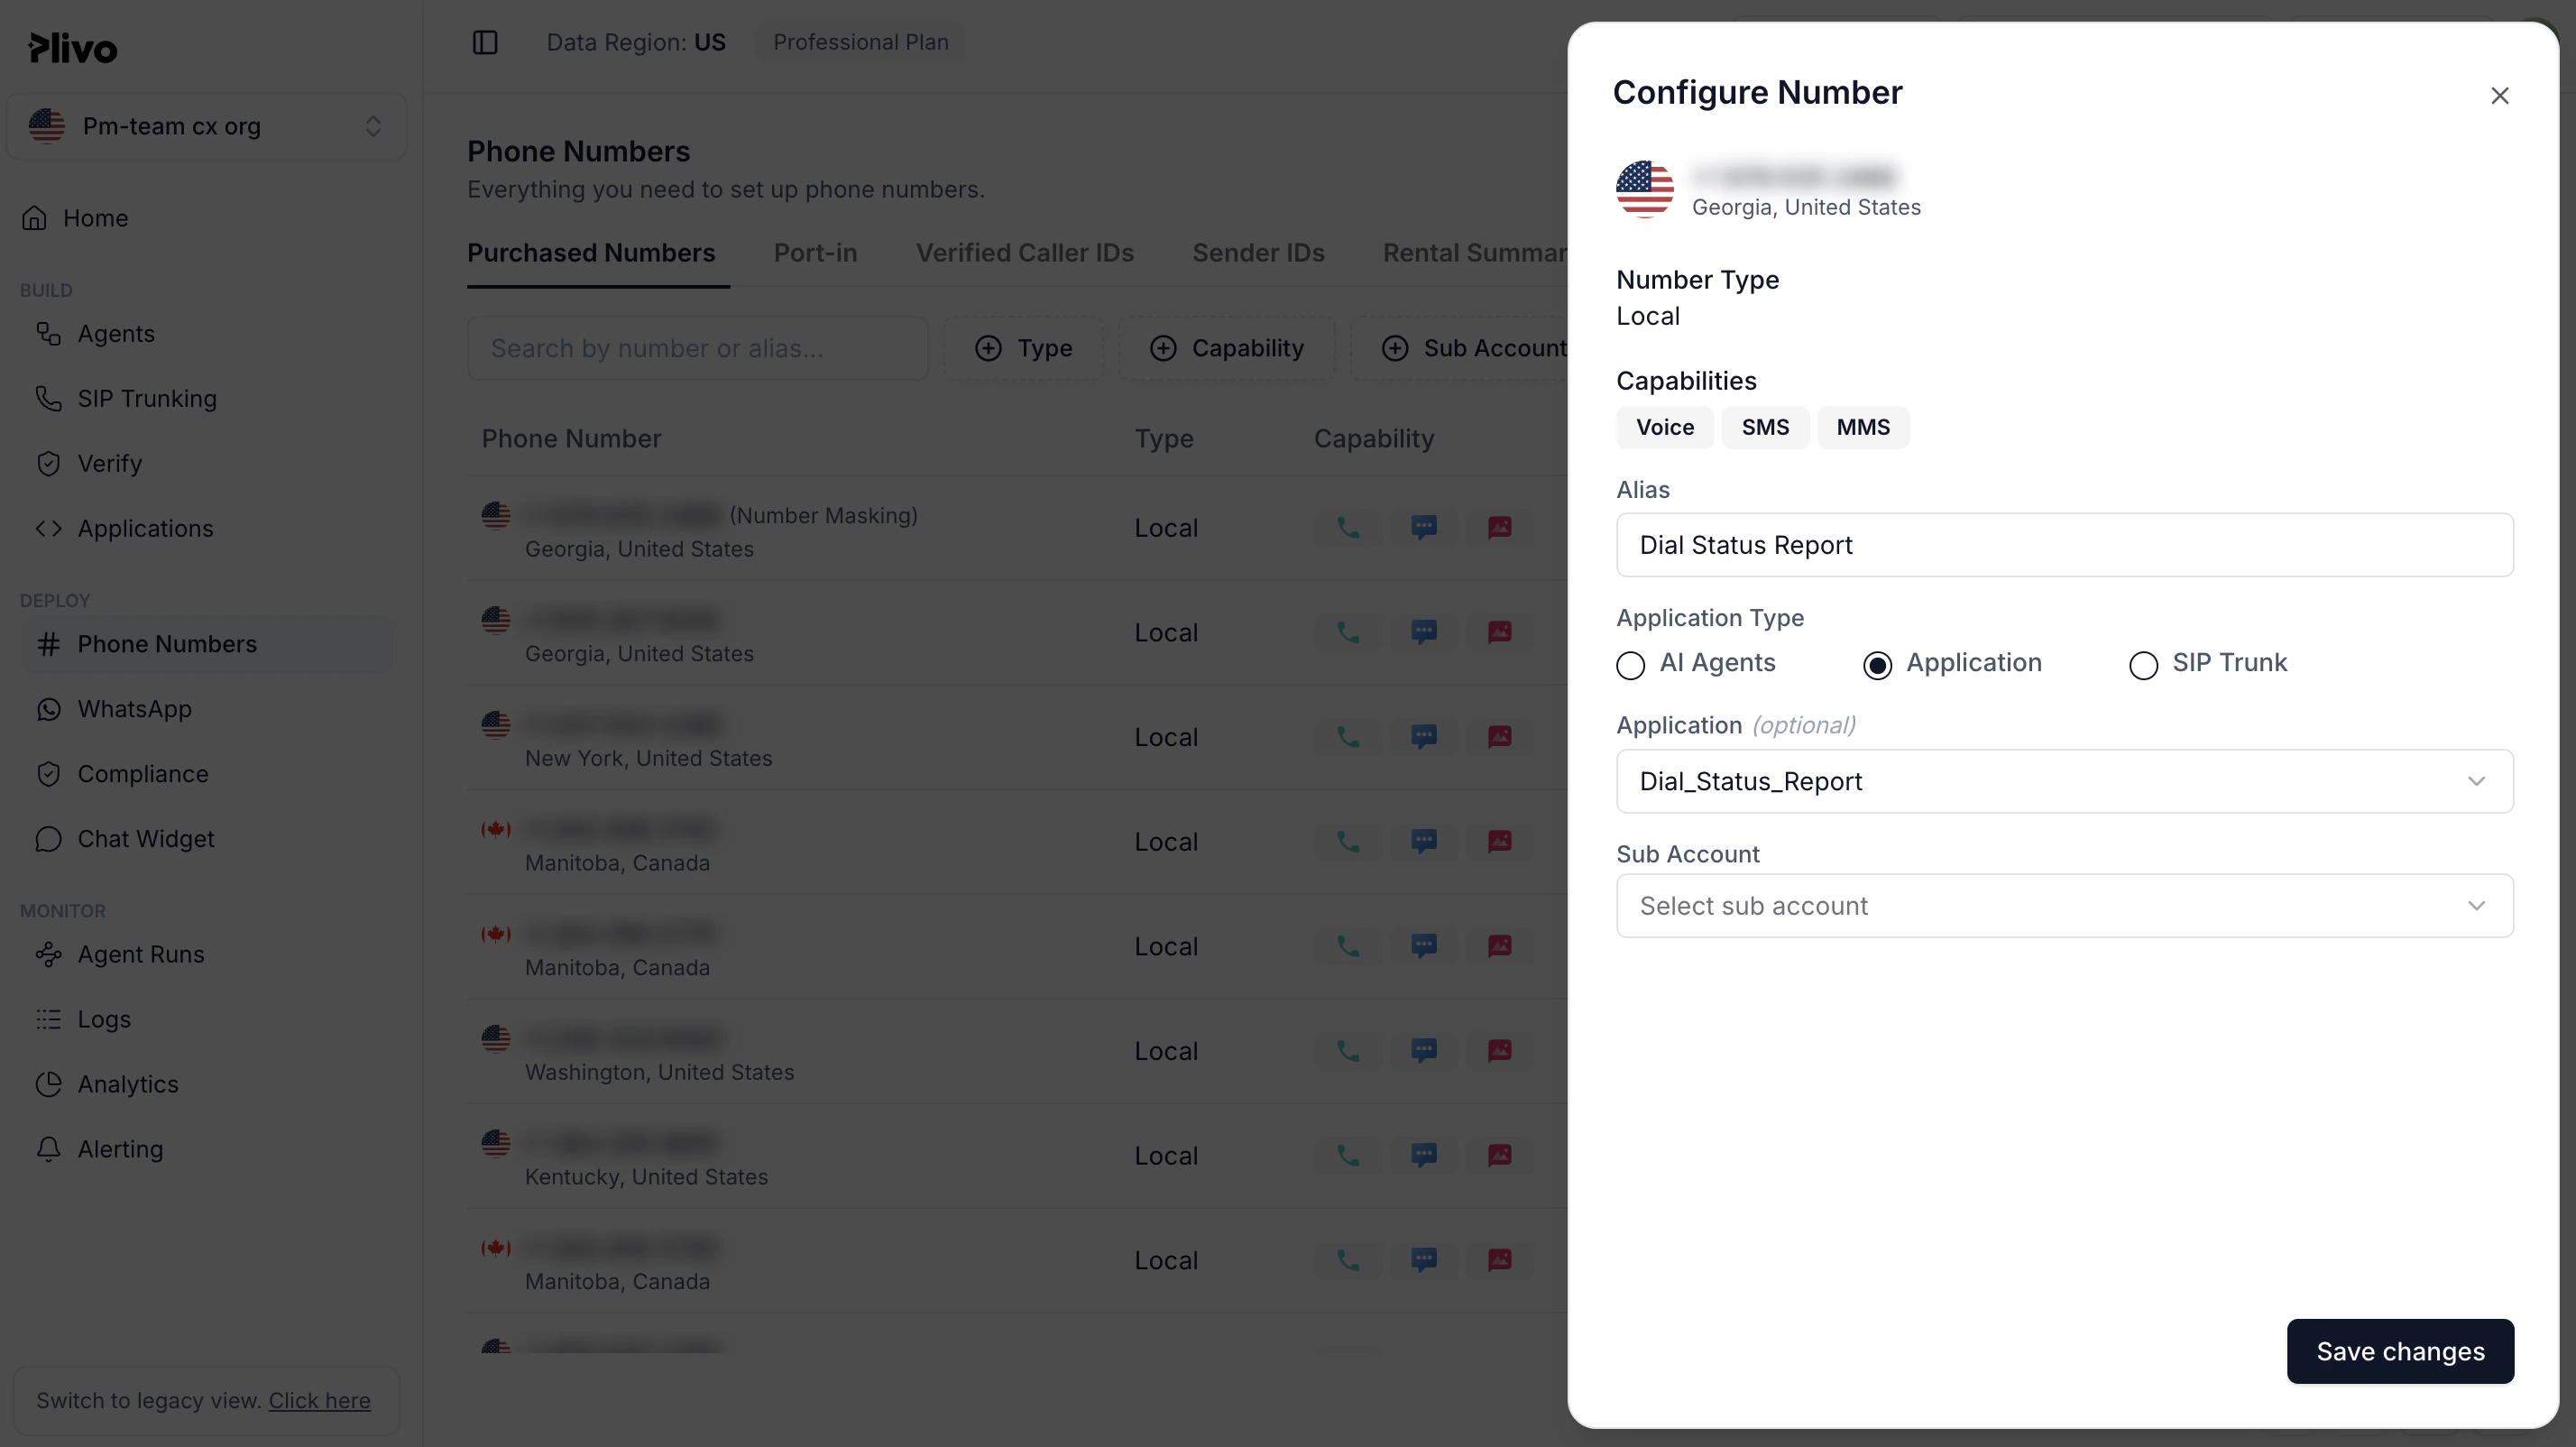
Navigate to the Numbers page and select the phone number you want to use for this application.

From the Application Type drop-down, select XML Application.

From the Plivo Application drop-down, select Dial Status Report (the name we gave the application).

Click Update Number to save.

assign dial status application

Test

Make a call to your Plivo number using any phone. Plivo will send a request to the answer URL you provided requesting an XML response and then process the call according to the instructions in the XML document the server provides, and call details will be posted to your application server via the action and callback URLs you configured throughout the course of the call.