Connect a Call to a Second Person Using Node.js

Overview

You may want to have an application dial out for someone, so that it calls them on their phone, then connects them to the number they want. This involves three tasks:

  1. Make an outbound call to a caller.
  2. When the call recipient answers the phone, place a new call to a different number (second user).
  3. Bridge the calls (first and second user) after the second user answers.

Common use cases for this practice include click to call, where a server application directs a call to a person who clicks on a web link, then connects them with a company representative.

This guide shows how to code connecting a user to second person on the Plivo platform, either by using our PHLO visual workflow builder or our APIs and XML documents. Follow the instructions in one of the tabs below.

You can create and deploy a PHLO to have an application call someone then connect them to a third party, and you can trigger the PHLO with a few lines of code.

Prerequisites

To get started, you need a Plivo account — sign up with your work email address if you don’t have one already. If this is your first time using Plivo APIs, follow our instructions to set up a Node.js development environment and a web server and safely expose that server to the internet.

Create the PHLO

To create a PHLO, visit the PHLO page of the Plivo console. If this is your first PHLO, the PHLO page will be empty.
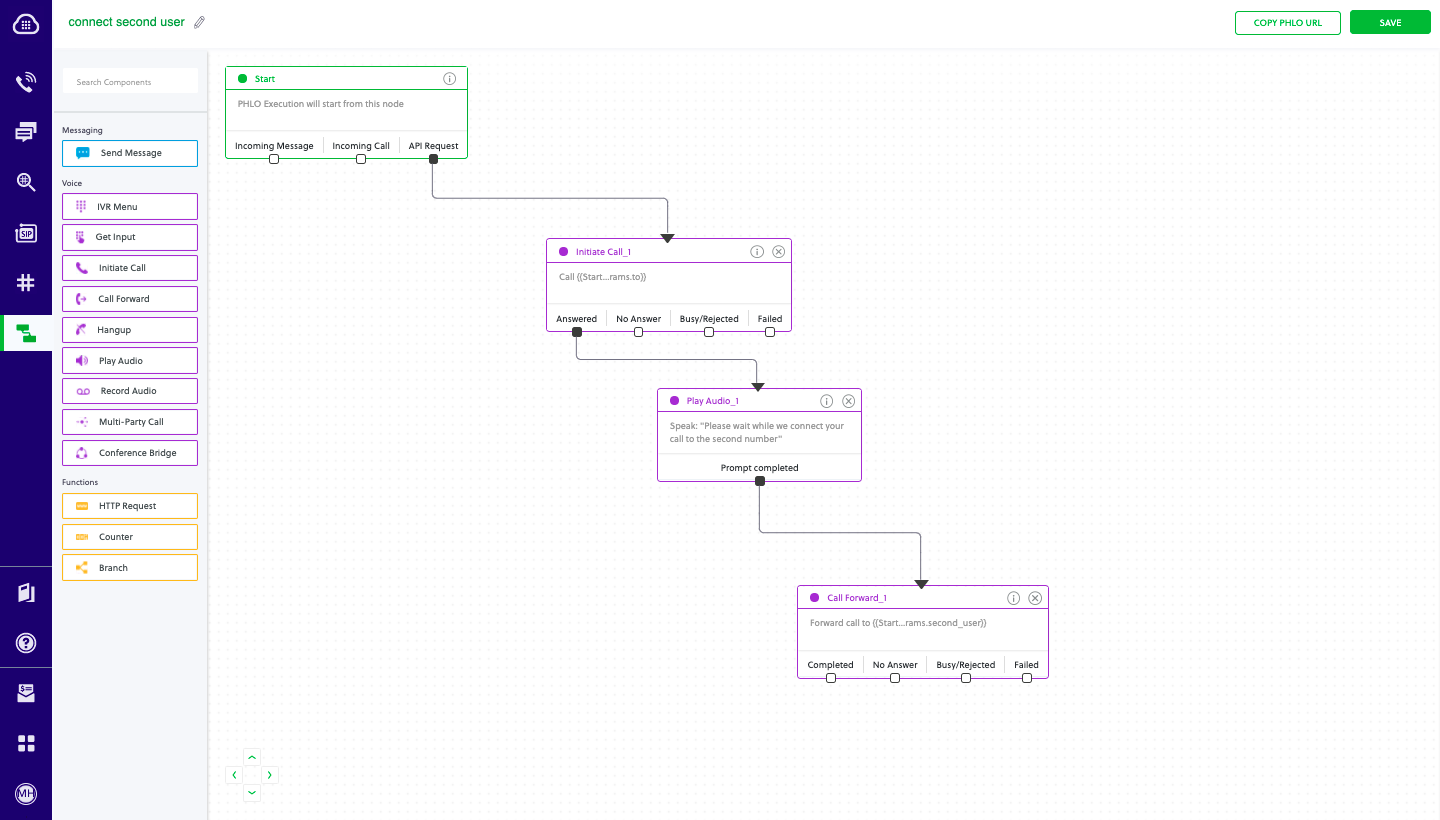
  • Click Create New PHLO.
  • In the Choose your use case pop-up, click Build my own. The PHLO canvas will appear with the Start node.
    Note: The Start node is the starting point of any PHLO. It lets you trigger a PHLO to start upon one of three actions: incoming SMS message, incoming call, or API request.
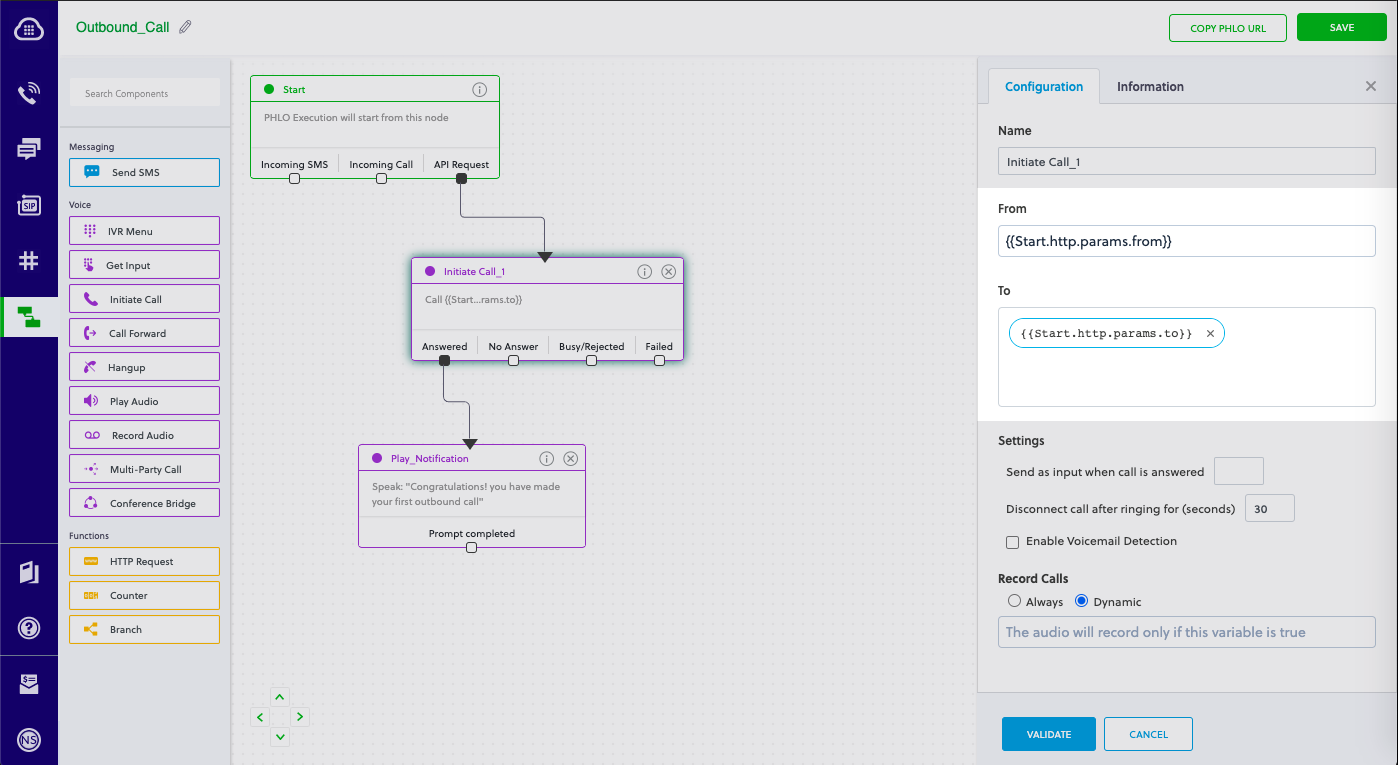
  • Click the Start node to open the Configuration tab, and then enter the information to retrieve from the HTTP Request payload — in this case key names for the From and To numbers and the second user‘s number.

  • Validate the configuration by clicking Validate. Do the same for each node as you go along.

  • From the list of components on the left side, drag and drop the Initiate Call component onto the canvas. This adds an Initiate Call node onto the canvas. When a component is placed on the canvas it becomes a node.

  • Draw a line to connect the Start node’s API Request trigger state to the Initiate Call node.

  • In the Configuration tab of the Initiate Call node, give the node a name. To enter values for the From and To fields, enter two curly brackets to view all available variables, and choose the appropriate ones. The values for the numbers will be retrieved from the HTTP Request payload you defined in the Start node.

  • From the list of components on the left side, drag and drop the Play Audio component onto the canvas. Draw a line to connect the Answered trigger state of the Initiate Call node with the Play Audio node.

  • Configure the Play Audio node to play a message to the user by entering text in the Speak Text box in the Prompt section of the Configuration pane. Enter a static message — for example, “Please wait while we connect your call to the second number.”

  • From the list of components on the left side, drag and drop the Call Forward component onto the canvas.

  • Draw a line to connect the Prompt Completed trigger state of the Play Audio with the Call Forward node.

  • In the Configuration tab of the Call Forward node, give the node a name. To enter values for the From and To fields, enter two curly brackets to view all available variables, and choose the appropriate ones. The values for the numbers will be retrieved from the HTTP Request payload you defined in the Start node.

  • After you complete and validate the node configurations, give the PHLO a name by clicking in the upper left, then click Save.

Your complete PHLO should look like this:

Connect Second User

Your PHLO is now ready to test.

Trigger the PHLO

You integrate a PHLO into your application workflow by making an API request to trigger the PHLO with the required payload — the set of parameters you pass to the PHLO. You can define a static payload by specifying values when you create the PHLO, or, as we do here, define a dynamic payload by passing values through parameters when you trigger the PHLO from your application.

With dynamic payload

To use dynamic values for the parameters, use Liquid templating parameters when you create the PHLO and pass the values from your code to the PHLO when you trigger it.

With Dynamic Payload

Code

Create a file called TriggerPhlo.js and paste into it this code.

1
2
3
4
5
6
7
8
9
10
11
12
13
14
15
16
17
18
19
var plivo = require('plivo');
var PhloClient = plivo.PhloClient;

var authId = '<auth_id>';
var authToken = '<auth_token>';
var phloId = '<phlo_id>';
var phloClient = phlo = null;

var payload = {
    from: '<caller_id>',
    to: '<destination_number>',
    second_user: '<second_number>'
}
phloClient = new PhloClient(authId, authToken);
phloClient.phlo(phloId).run(payload).then(function (result) {
    console.log('Phlo run result', result);
}).catch(function (err) {
    console.error('Phlo run failed', err);
});

Replace the auth placeholders with your authentication credentials from the Plivo console. Replace the phlo_id placeholder with your PHLO ID from the Plivo console. Replace the phone number placeholders with actual phone numbers in E.164 format (for example, +12025551234).

Test

Save the file and run it.

node TriggerPhlo.js
Note: If you’re using a Plivo Trial account, you can make calls only to phone numbers that have been verified with Plivo. You can verify (sandbox) a number by going to the console’s Phone Numbers > Sandbox Numbers page.

Here‘s how to connect a call to a second person using XML.

Prerequisites

To get started, you need a Plivo account — sign up with your work email address if you don’t have one already. You must have a voice-enabled Plivo phone number to receive incoming calls; you can rent numbers from the Numbers page of the Plivo console, or by using the Numbers API. If this is your first time using Plivo APIs, follow our instructions to set up a Node.js development environment and a web server and safely expose that server to the internet.

Create an Express server to connect calls to a second person

Create a file called connect_call.js and paste into it this code.

1
2
3
4
5
6
7
8
9
10
11
12
13
14
15
16
17
18
19
20
21
22
23
24
25
26
27
28
29
30
31
32
33
34
35
36
var express = require('express');
var plivo = require('plivo');

var app = express();

app.set('port', (process.env.PORT || 5000));
app.use(express.urlencoded({extended: true}));

app.all('/outbound_call/', function(request, response) {
    var client = new plivo.Client("<auth_id>","<auth_token>");
    var resp = client.calls.create(
        "<caller_id>",
        "<destination_number>",
        request.protocol + '://' + request.get('host') + "/connect",
    ).then(function (response) {
        console.log(response);
    },function (err) {
        console.error(err);
    });
    
});

app.post('/connect/', function(request, response) {
    var res = plivo.Response();
    
    res.addSpeak("Please wait while we connect the call to second person");
    var dial = res.addDial();
    dial.addNumber("<second_number>"); // Dial to second number
    
    response.set({'Content-Type': 'text/xml'});
    response.send(res.toXML());
});

app.listen(app.get('port'), function() {
    console.log('Node app is running on port', app.get('port'));
});

Replace the auth placeholders with your authentication credentials from the Plivo console. Replace the phone number placeholders with actual phone numbers (for example, 12025551234).

Save the file and run it.

node connect_call.js

You should see your basic server application in action at http://localhost:3000/outbound_call/.

Set up ngrok to expose your local server to the internet.

Note: We recommend that you store your credentials in the auth_id and auth_token environment variables, to avoid the possibility of accidentally committing them to source control. If you do this, you can initialize the client with no arguments and Plivo will automatically fetch them from the environment variables. You can use process.env to store environment variables and fetch them when initializing the client.

Test

Have your application make a call to a regular mobile phone. Plivo will send a request to your answer URL requesting a valid XML response and connect the call to a second user.

Note: If you are using a Plivo Trial account for this example, you can only make calls to phone numbers that have been verified with Plivo. Phone numbers can be verified at the Sandbox Numbers page.