Overview
Plivo’s PHLO allows you to quickly create and configure a similar Easy Trunk call Forwarding system for your business. This guide explains how you can migrate your existing Easytrunk hosted voice application to PHLO, which then forwards your Plivo number’s incoming calls to an IP PBX and SIP endpoint.Prerequisites
- Create a Plivo account (if you don’t have one already): Sign up with your work email address and complete the phone verification step using your mobile number.
- Buy a Plivo number: You must have a voice-enabled Plivo phone number to receive incoming calls. Purchase numbers from the Numbers section of your Plivo console or using the Numbers API.
- PHLO application: When you receive a call on a Plivo voice-enabled number, you can control the call flow by associating a PHLO application to that Plivo phone number. Plivo will fetch the PHLO associated with the number and expect valid instructions via PHLO to handle the call. The following steps instruct you how to create a PHLO.
Create a PHLO to forward inbound calls
To forward an incoming call, you can create and deploy a PHLO with a few clicks on the PHLO canvas. Refer to the instructions below to create a PHLO that forwards an incoming call:
- On the side navigation bar, click PHLO. The PHLO page will appear and display your existing PHLOs, if any exist. If this is your first PHLO, then the PHLO page will be empty.
- Click Create New PHLO to build a new PHLO.
- In the Choose your use-case window, choose Call Forwarding use-case. The PHLO canvas will appear with a pre-built template for the Call Forwarding use-case.
- Configure the Call Forward node.
- From field: This will be already configured with {{Start.call.from}}. Caller Id to display to the recipient of the forwarded call.
- To field: List of recipients to forward the incoming call and to bridge into the active call. The list can contain IP PBXes, and SIP endpoints separated by a comma. Refer to the below example:
- sip:1NPANXXYYYY@sip.example.com
- sip:phonenumber@192.0.0.1
- sip:sipendpoint@phone.plivo.com
Note: You must choose sequential for call forwarding configuration setting so that it will be dialed sequentially on failover.
- Once you have configured the node, click Validate to save the configurations.
- After you complete the configurations, provide a recognizable name for your PHLO and click Save. Your PHLO is now ready.
Assign the PHLO to a Plivo number to forward incoming calls
Once you have created and configured your PHLO, assign your PHLO to a Plivo number.To assign a PHLO to a number:
- Log in to the Plivo console.
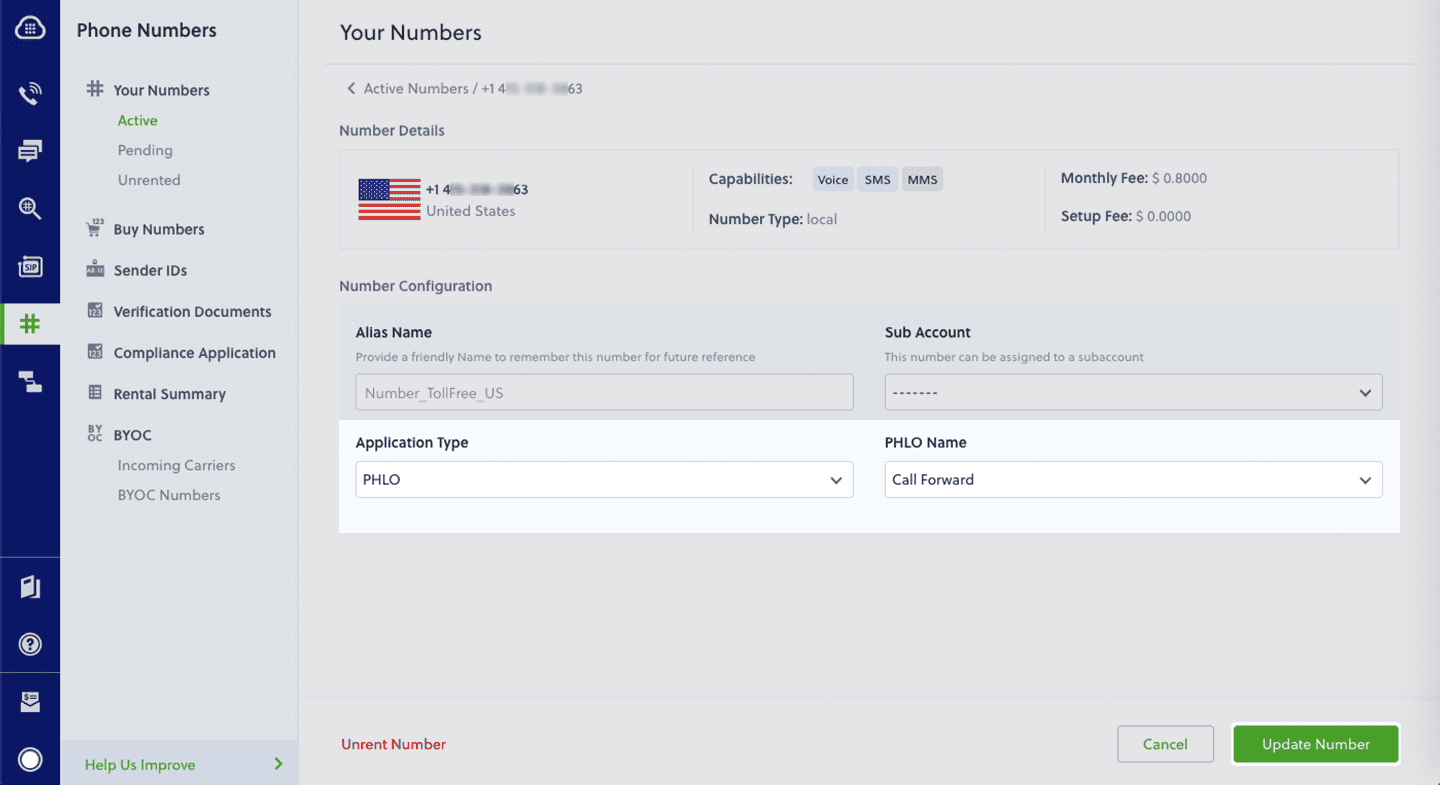
- On the Product Navigation bar, click Phone Numbers.
- On the Numbers page, under Your Numbers, click the phone number you want to use for the PHLO.
- In the Number Configuration window, select PHLO from the Application Type list.
- From the PHLO Name list, select the PHLO you wish to use with the phone number, then click Update Number.
Test
Make a call to your Plivo phone number and see how the inbound call is forwarded to the list of IP PBXes and endpoint specified in the PHLO. For more information about creating a PHLO app, see the PHLO User Guide.For information on components and their variables, see the PHLO Components Library.