Set up Voice Termination with Twilio Bring Your Own Carrier (BYOC) Trunking Service
Overview
Using Zentrunk, Plivo’s SIP trunking platform, you can terminate calls from Twilio using Plivo as the carrier. This guide will help you to set up Plivo as a BYOC trunk on the Twilio platform, and whenever you terminate calls from Twilio using the BYOC trunk, Plivo will act as the carrier for those calls.
To implement this functionality, you must:
- Create a Plivo outbound trunk on the Plivo platform
- Create a Twilio BYOC trunk on the Twilio platform
Create a Plivo Outbound Trunk
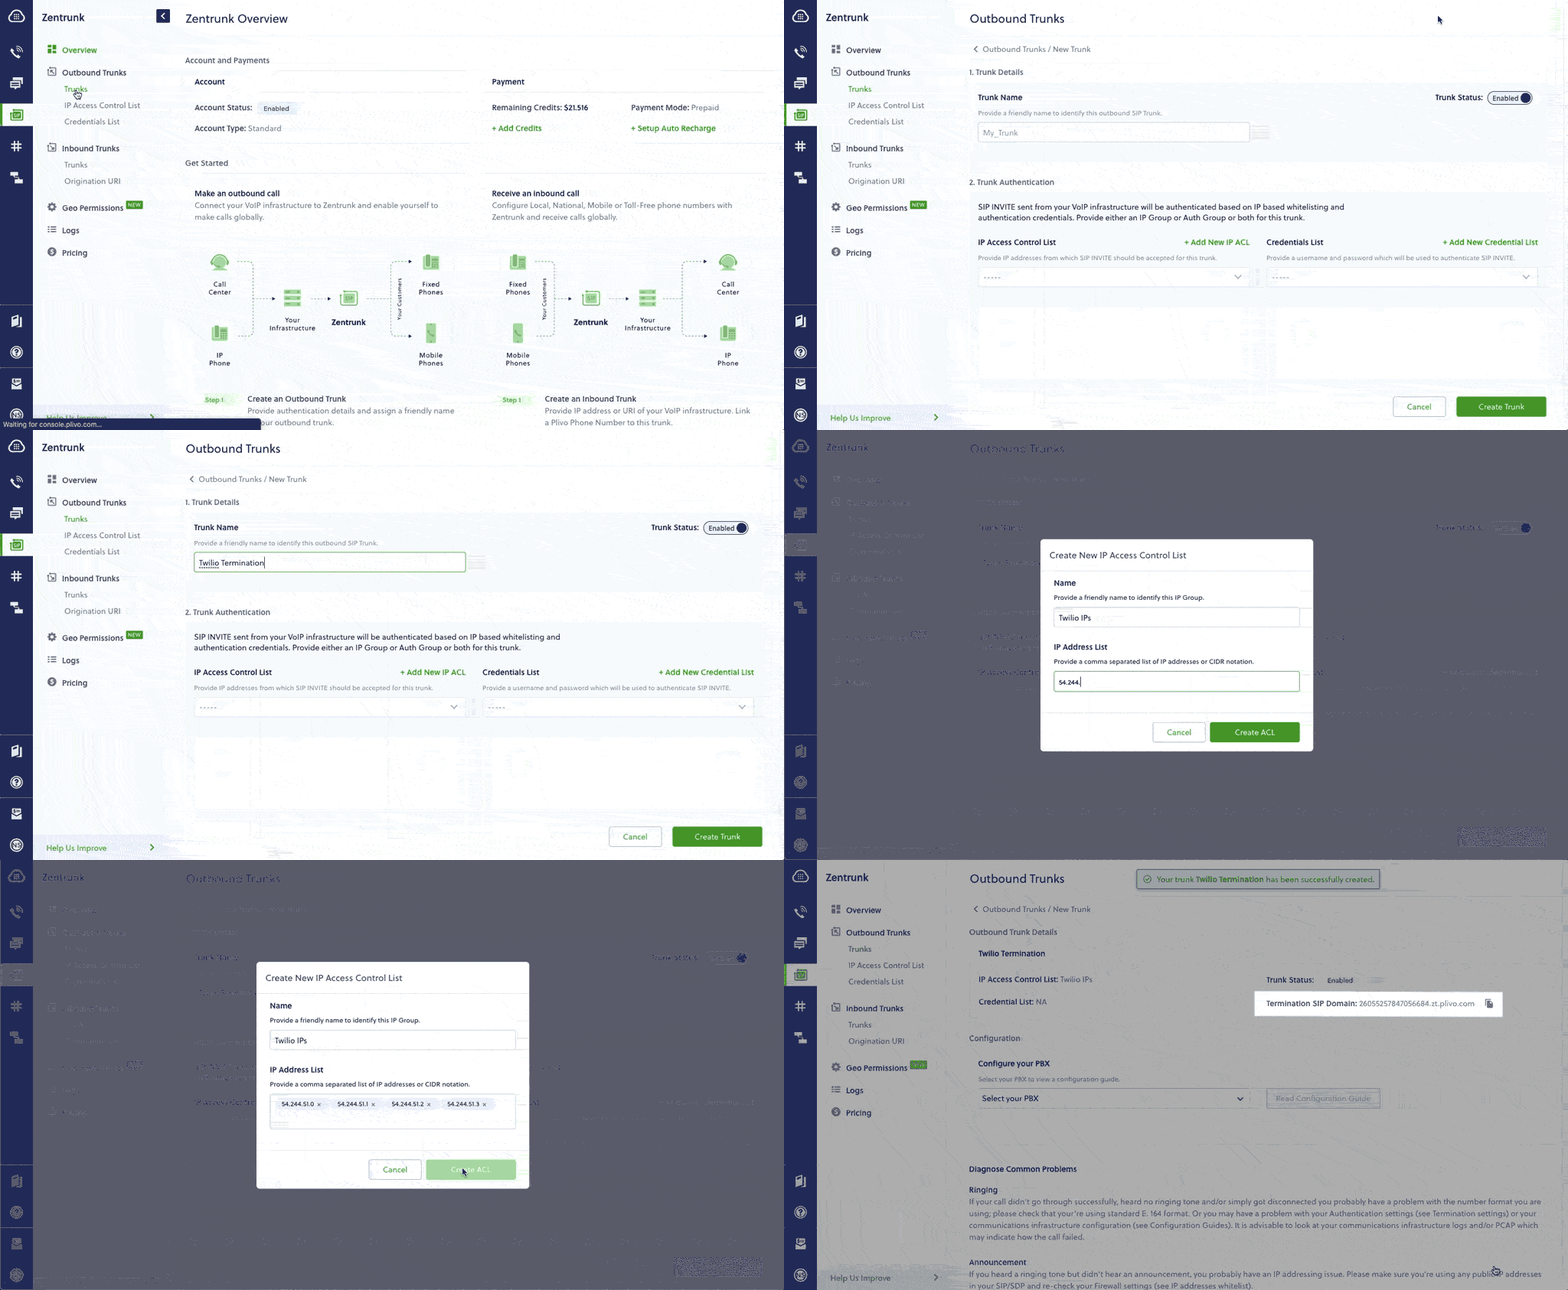
You need to set up the trunk authentication on the Plivo Console to use Zentrunk to terminate calls. Authentication of your trunk ensures that Zentrunk only accepts traffic that your infrastructure sends securely. You can configure your trunk to be authenticated by an IP Access Control List, a Credentials List, or both. For more information, please check the step-by-step GIF & instructions below.
To create an Outbound Trunk:
-
On the Outbound Trunks page in your Plivo Console, click “Create New Outbound Trunk”.
-
In the New Trunk window, enter a name for your trunk (for example, Twilio Termination).
Note: By default, the trunk is enabled.
-
Under Trunk Authentication, to Create an IP Access Control List:
-
Click ”+ Add New IP ACL”.
-
In the ‘Create New IP Access Control List’ window, enter the name for your IP Access Control List (for example, Twilio IPs) and then provide the following IP addresses to be whitelisted in the IP Address List field.
- 54.244.51.0
- 54.244.51.1
- 54.244.51.2
- 54.244.51.3
Note: In the “IP Access Control List” you can specify the list of IP addresses from which the SIP Invite will be accepted for this trunk.
-
Click “Create ACL” to save and add your IP Access Control List.
-
-
Select the IP Group, and click “Create Trunk”. Your Outbound trunk will be created.
-
Once the trunk is created, copy and store the Termination SIP Domain URI that ends with .zt.plivo.com. This will be useful while creating the BYOC trunk on the Twilio Platform in the next section.
Create a Twilio BYOC Trunk
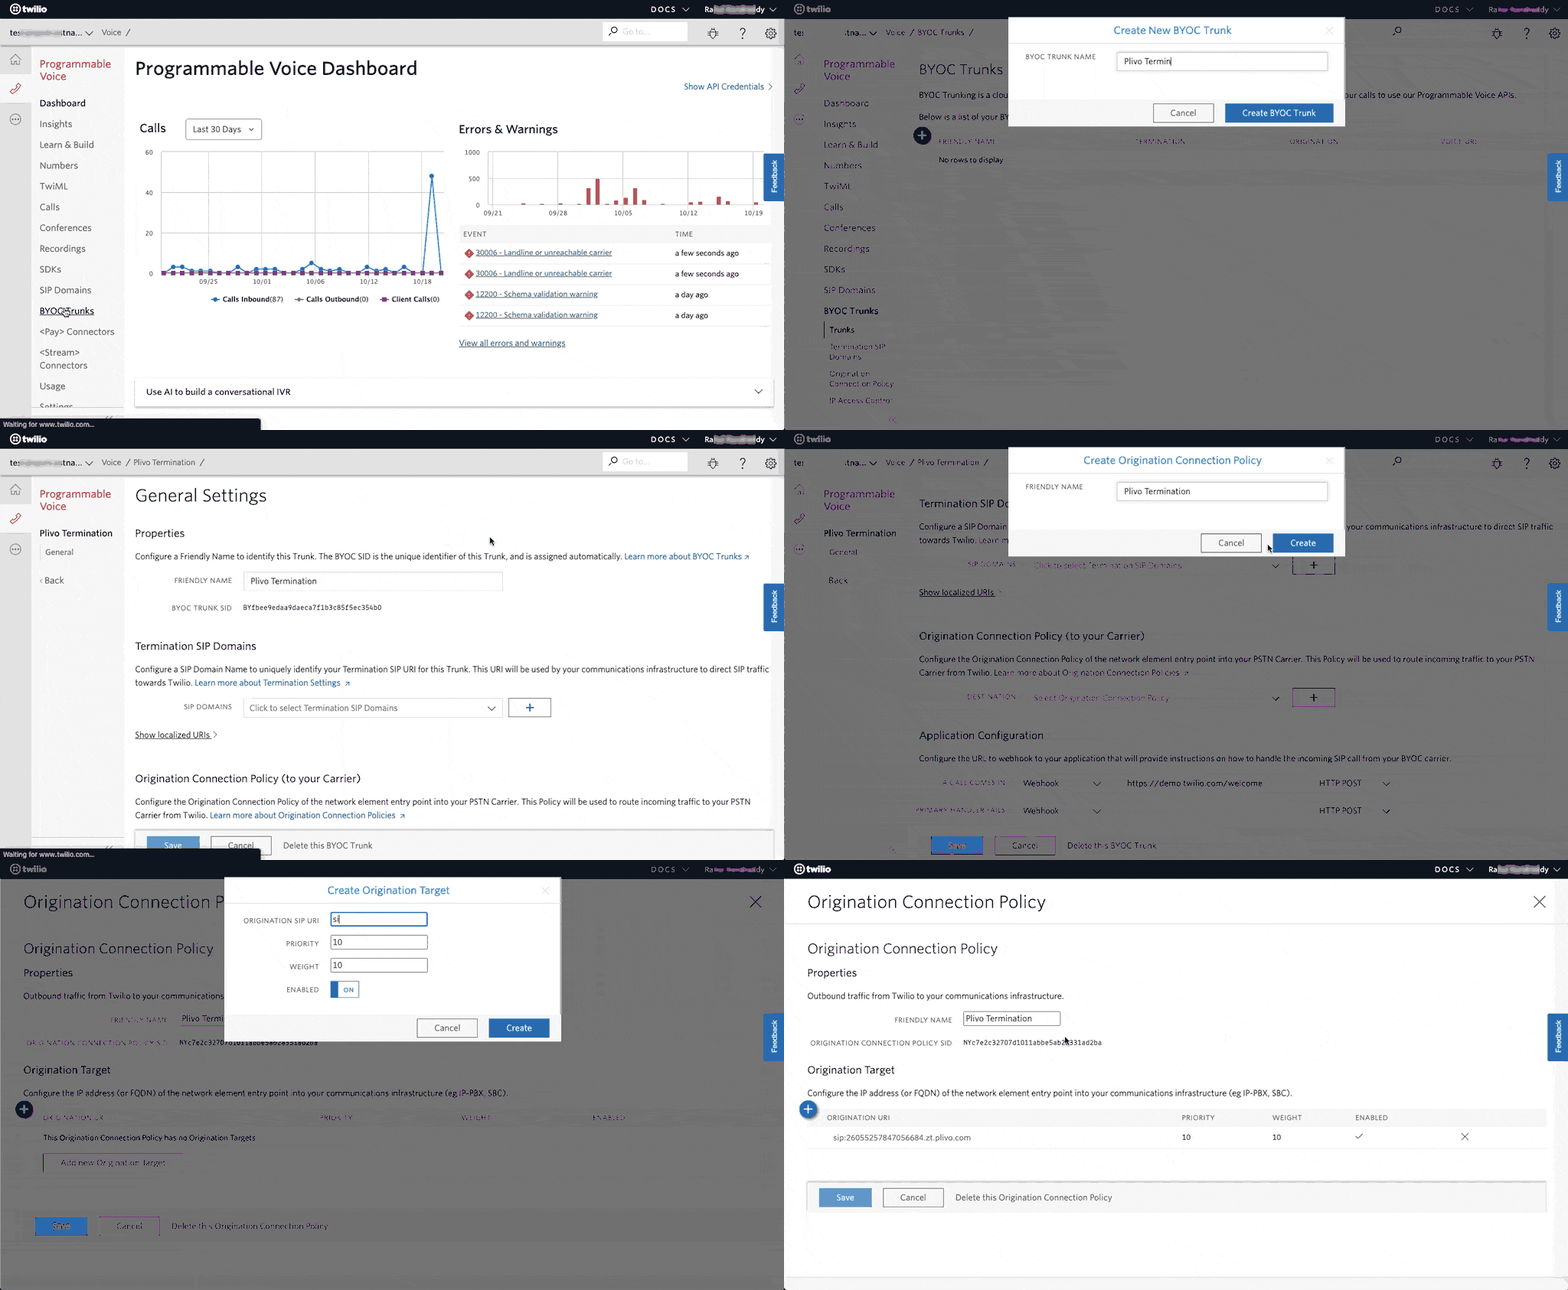
You can follow the below GIF and instructions set to create a BYOC trunk on the Twilio platform and set up the Plivo Zentrunk which you created in the previous step as the BYOC trunk.
- On the BYOC Trunk page, click on the ”+” button to create a new trunk.
- Give a name for the trunk and click the “Create BYOC Trunk” button.
- In the “Origination Connection Policy (to your Carrier)” section, click on the ”+” button to create a new Origination Connection Policy
- Provide a name for the origination connection policy and click on the “create” button.
- Click on the ”+” button to create a new origination target and provide the previously copied Plivo’s Termination SIP Domain URI with “sip:” as a prefix.
- Click on the “Create” button to create a new Origination Target.
- Click on “Save” in the BYOC Trunks page to save the new create BYOC Trunk.
- Copy the BYOC Trunk SID.
Make an Outbound call using the BYOC Trunk
You can terminate calls via your BYOC trunk by using the below cURL code snippet.
Also, if you are interested in integrating your PBX/SBC with Plivo outbound trunks, you can click here to sign up for free and create your first SIP trunk today!
Set up Voice Origination with Twilio Bring Your Own Number (BYON) Service
Overview
Using the Plivo SIP-trunking platform, you can use your Plivo numbers to route calls to the Twilio voice platform. In this guide, we will walk you through how to set up a Plivo number for voice origination via Twilio’s BYON (Bring Your Own Number) service for routing the calls to a Twilio SIP Domain.
To achieve this functionality, you must complete the following two configurations on the Twilio and the Plivo platforms:
- Create a Twilio SIP domain with an ACL (with Plivo IPs).
- Create a Plivo inbound trunk and assign it to a Plivo number.
Create a Twilio SIP Domain with an ACL
Follow the steps below to create a Twilio SIP domain and authenticate the calls routed through Plivo.
- Create an Access Control List (ACL) to authenticate Plivo IPs with Twilio
- Create a SIP domain and choose the ACL with Plivo IPs
Create an ACL to authenticate Plivo IPs with Twilio
To send traffic to a Twilio SIP domain from Plivo, the traffic must be first authenticated with an IP whitelist or username and password.
To create an IP whitelist:
-
Navigate to the IP Access Control Lists page here.
-
In the “New Access Control List” page, Enter a friendly name that will help you remember the IP group and then add in the following Plivo IPs:
Regions IP Addresses North California, USA 13.52.9.0/25 Virginia, USA 18.214.109.128/25 18.215.142.0/26 Frankfurt, Germany 3.120.121.128/26 Sao Paulo, Brazil 18.228.70.64/26 Sydney, Australia 13.238.202.192/26 Singapore 18.136.1.128/26
Create a SIP domain and choose the ACL (with Plivo IPs)
You need to follow the below instructions to complete the configuration on the Twilio side:
-
You can navigate to the Twilio SIP Domains page here and provide a domain name for the new SIP domain.
-
Choose the IP ACL (with Plivo IPs) you created in the previous step.
-
Copy and store the SIP URI. This will be helpful while creating the trunk on the Plivo platform (next step).
Note: Twilio SIP domain is a custom DNS host name associated with your Twilio account that can accept SIP traffic. This maps a domain name to the IP address (IPv4) of the computer hosting the domain.
Create a Plivo inbound trunk and assign it to a Plivo number.
To create an Inbound Trunk:
- On the Inbound Trunks page in your Plivo Console, click Create New Inbound Trunk.
- On the New Trunk window, enter a name for your trunk (for example, Twilio Origination).
Note: The Enabled checkbox is selected by default.
- Select the Primary URI and Fallback URI of your PBX.
Note: The Primary URI is the FQDN or IP address to which all calls are forwarded first. If the Primary URI is unresponsive, the calls will be forwarded to the Fallback URI. Please note that the Fallback URI is optional.
- To add a new Primary or Fallback URI, click Add new URI.
- On the Create URI window, enter a name for your URI (for example, Twilio_origin), and then enter the SIP URI of the Twilio SIP domain (the one which you stored while configuring the SIP domain in the previous section).
- To enable Authentication, click on the Authentication option and provide username & password.
- Click Create URI to save and add your URI.
- Once you have created and selected your Primary and Fallback URI, click Create Trunk. Your inbound trunk will be created.
To assign an inbound trunk to a Plivo Number:
- Once you click on Create Trunk, in the next window you can link your trunk with Phone numbers.
- You can either link the trunk with your existing phone numbers in your account or buy a new phone number and link the trunk.
- If you wish to use your existing numbers, select the phone numbers under the Current Phone Numbers section, and click Link Selected Numbers.
- If you wish to use a new number, navigate to the Buy New Number section and choose the country, prefix, type, capability, and click on Search.
- Select a Phone number and click Buy Number.
- Once you click on Buy Number, the number will be added to your account and the same will be linked with your inbound trunk.
To know more about buying a Plivo Phone number, please navigate to the Buy a number section.
Test & Validate
Now, your setup is complete. You can make calls to the Plivo number and see that the calls are routed to the Twilio SIP domain to execute the webhook or the application set up at Twilio end.