Pass Custom SIP Headers

Overview

SIP headers (also called SIP fields) are part of every HTTP request made by an outbound call. They can convey message attributes to ensure that information packets travel along the correct path between devices on different networks.

SIP headers are categorized into four main types: record-route headers, route headers, via headers, and contact headers. They always have the format

<header_name>:<value>

Plivo SIP headers are always prefixed with X-PH-. Only characters [A-Z], [a-z], and [0-9] are allowed as part of either a SIP header name or value to ensure that you can encode them in a URL. You can use multiple header fields by entering them as a comma-separated list:

head1=val1,head2=val2,head3=val3,...,headn=valn

You can use custom SIP headers to pass information (such as customer ID or product information) from a front-end application to a back-end application and vice versa.

If you’re using a SIP endpoint and you’ve configured it to send custom SIP headers, Plivo will send the SIP headers with your HTTP request.

You can pass custom SIP headers either by using our PHLO visual workflow builder or our APIs and XML documents. Follow the instructions in one of the tabs below.

You can create and deploy a PHLO to make an outbound call with custom SIP headers with a few clicks on the PHLO canvas.

How it works

Outbound Call Flow

Prerequisites

To get started, you need a Plivo account — sign up with your work email address if you don’t have one already. If this is your first PHLO, follow our instructions to set up a Node.js development environment.

Create the PHLO

To create a PHLO, visit the PHLO page of the Plivo console. If this is your first PHLO, the PHLO page will be empty.

Create a PHLO for Outbound Calls with Custom SIP Headers

  • Click Create New PHLO.
  • In the Choose your use case pop-up, click Build my own. The PHLO canvas will appear with the Start node.
    Note: The Start node is the starting point of any PHLO. It lets you trigger a PHLO to start upon one of three actions: incoming SMS message, incoming call, or API request.
  • From the list of components on the left side, drag and drop the Initiate Call component onto the canvas. When a component is placed on the canvas it becomes a node.
  • Draw a line to connect the Start node’s API Request trigger state to the Initiate Call node.
  • In the Configuration pane at the right of the canvas, configure the Initiate Call node with a caller ID in the From field. Enter the destination number you want to call in the To field. Enter the custom SIP headers you want to add in the Custom Headers field.
  • Once you’ve configured the node, click Validate to save the configuration.
  • Similarly, create a node from the Play Audio component. Connect the Initiate Call node to the Play Audio node using the Answered trigger state.
  • Configure the Play Audio node to play a message to the user by entering text in the Speak Text box in the Prompt section of the Configuration pane — for example, “Hello, you just received your first call.”
  • Connect the Initiate Call node’s Answered trigger state to the Play Audio node.
  • After you complete the configuration, give the PHLO a name by clicking in the upper left, then click Save.

Your PHLO is now ready to test.

Trigger the PHLO

You integrate a PHLO into your application workflow by making an API request to trigger the PHLO with the required payload — the set of parameters you pass to the PHLO. You can define a static payload by specifying values when you create the PHLO, or define a dynamic payload by passing values through parameters when you trigger the PHLO from your application.

In either case, you need your Auth ID and Auth Token, which you can get from the overview page of the Plivo console.

With a static payload

When you configure values when creating the PHLO, they act as a static payload.

With Static Payload

Code

Create a file called TriggerPhlo.js and paste into it this code.

1
2
3
4
5
6
7
8
9
10
11
12
13
14
var plivo = require('plivo');
var PhloClient = plivo.PhloClient;

var authId = '<auth_id>';
var authToken = '<auth_token>';
var phloId = '<phlo_id>';
var phloClient = phlo = null;

phloClient = new PhloClient(authId, authToken);
phloClient.phlo(phloId).run().then(function (result) {
    console.log('Phlo run result', result);
}).catch(function (err) {
    console.error('Phlo run failed', err);
});

Replace the auth placeholders with your authentication credentials from the Plivo console. Replace the phlo_id placeholder with your PHLO ID from the Plivo console.

With a dynamic payload

To use dynamic values for the parameters, use Liquid templating parameters when you create the PHLO and pass the values from your code when you trigger it.

With Dynamic Payload

Code

Create a file called TriggerPhlo.js and paste into it this code.

1
2
3
4
5
6
7
8
9
10
11
12
13
14
15
16
17
18
var plivo = require('plivo');
var PhloClient = plivo.PhloClient;

var authId = '<auth_id>';
var authToken = '<auth_token>';
var phloId = '<phlo_id>';
var phloClient = phlo = null;

var payload = {
    from: '<caller_id>',
    to: '<destination_number>'
}
phloClient = new PhloClient(authId, authToken);
phloClient.phlo(phloId).run(payload).then(function (result) {
    console.log('Phlo run result', result);
}).catch(function (err) {
    console.error('Phlo run failed', err);
});

Replace the auth placeholders with your authentication credentials from the Plivo console. Replace the phlo_id placeholder with your PHLO ID from the Plivo console. Replace the phone number placeholders with actual phone numbers in E.164 format (for example, +12025551234).

Test

Save the file and run it.

$ node TriggerPhlo.js
Note: If you’re using a Plivo Trial account, you can make calls only to phone numbers that have been verified with Plivo. You can verify (sandbox) a number by going to the console’s Phone Numbers > Sandbox Numbers page.

Here’s how to use Plivo APIs and XML to make an outbound call with custom SIP headers.
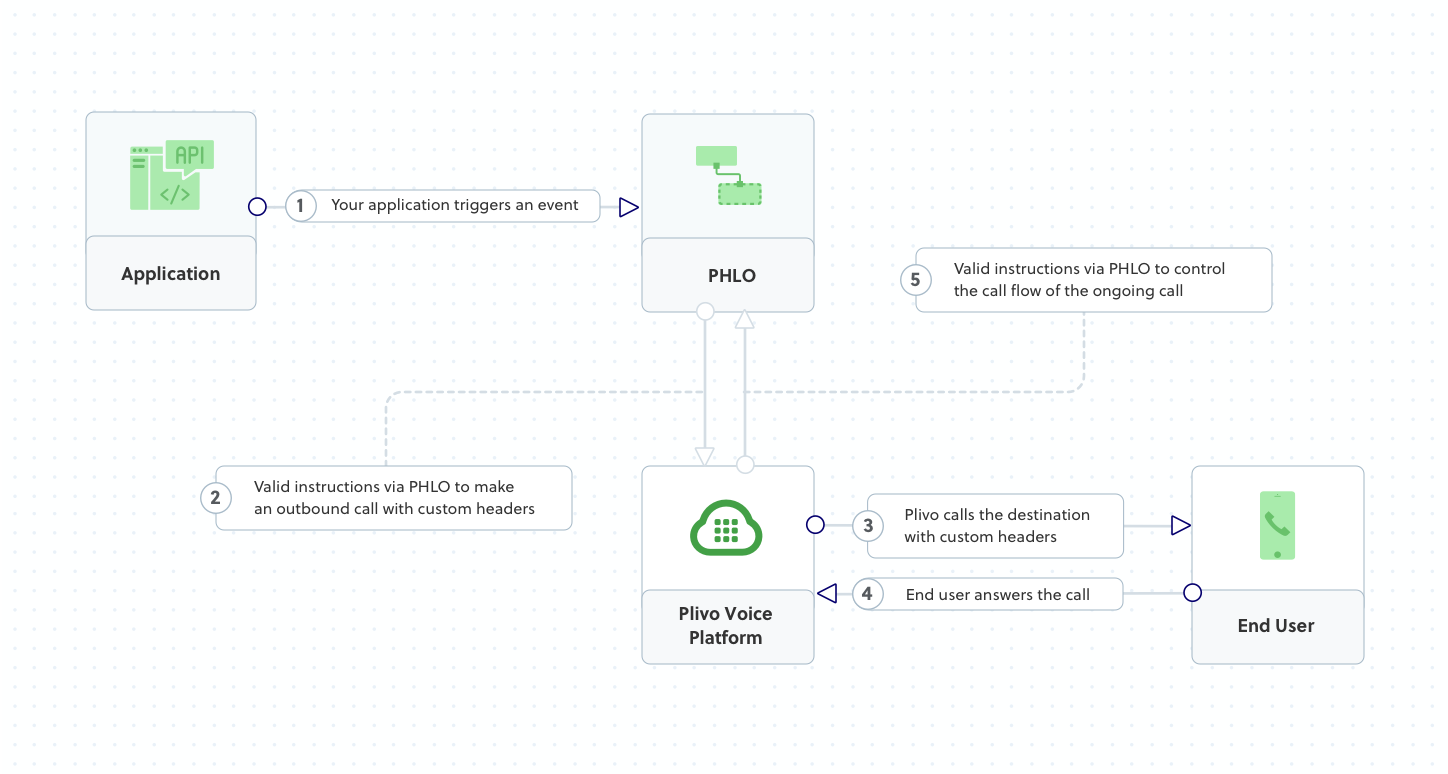
How it works

Custom SIP Headers- Call Flow

Plivo requests an answer URL when the call is answered (step 4) and expects the file at that address to hold a valid XML response from the application with instructions on how to handle the call. To see how this works, you can use https://s3.amazonaws.com/static.plivo.com/answer.xml as an answer URL to test your first outgoing call. The file contains this XML code:

<Response> 
<Speak>Congratulations! You've made your first outbound call!</Speak> 
</Response>

This code instructs Plivo to say, “Congratulations! You’ve made your first outbound call!” to the call recipient. You can find the entire list of valid Plivo XML verbs in our XML Reference documentation.

Prerequisites

To get started, you need a Plivo account — sign up with your work email address if you don’t have one already. If this is your first time using Plivo APIs, follow our instructions to set up a Node.js development environment.

Create the outbound call application with custom SIP headers

Create a file called Makecall.js and paste into it this code.

1
2
3
4
5
6
7
8
9
10
11
12
13
14
15
16
17
18
19
20
21
var plivo = require('plivo');

(function main() {
    'use strict';
    
   // If auth id and auth token are not specified, Plivo will fetch them from the environment variables.
    var client = new plivo.Client("<auth_id>","<auth_token>");
    client.calls.create(
        "<caller_id>", // from
        "<destination_number>", // to
        "https://s3.amazonaws.com/static.plivo.com/answer.xml", // answer url
        {
            answerMethod: "GET",
            sipHeaders: "Test=Sample"
        },
    ).then(function (response) {
        console.log(response);
    }, function (err) {
        console.error(err);
    });
})();

Replace the auth placeholders with your authentication credentials from the Plivo console. Replace the phone number placeholders with actual phone numbers in E.164 format (for example, +12025551234). Destination_number may also be a SIP endpoint, in which case the destination_number placeholder must be a valid SIP URI — for example, sip:john1234@phone.plivo.com.

Note: We recommend that you store your authentication credentials in the auth_id and auth_token environment variables, to avoid the possibility of accidentally committing them to source control. If you do this, you can initialize the client with no arguments and it will automatically fetch them from the environment variables. You can use process.env to store environment variables and fetch them when initializing the client.

Test

Save the file and run it.

$ node Makecall.js
Note: If you’re using a Plivo Trial account, you can make calls only to phone numbers that have been verified with Plivo. You can verify (sandbox) a number by going to the console’s Phone Numbers > Sandbox Numbers page.

Sample response

(201, {
        u'message': u'call fired',
        u'request_uuid': u'85b1d45d-bc12-47f5-89c7-ae4a2c5d5713',
        u'api_id': u'ad0e27a8-9008-11e4-b932-22000ac50fac'
    }
)

The SIP header can be seen as a query parameter in the answer_url

/answer.xml?Direction=outbound&From=1111111111&ALegUUID=5260e820-958c-11e4-b6bf-498d468c930b&BillRate=0.00300&
To=sip%3Aabcd150105094929%40phone.plivo.com&<mark>X-PH-Test=Sample</mark>&CallUUID=5260e820-958c-11e4-b6bf-498d468c930b&ALegRequestUUID=2202d0ab-a890-4199-8582-e7a2615cb23b&
RequestUUID=2202d0ab-a890-4199-8582-e7a2615cb23b&SIP-H-To=%3Csip%3Aabcd150105094929%40phone.plivo.com%3E%3Btag%3D6U9J4.uVHI7KyEKSgD8vrPnAKQoR2QXc&
CallStatus=in-progress&Event=StartApp