Install PHP, Laravel, and the Plivo PHP SDK
You must set up and install PHP, Laravel, and Plivo’s PHP SDK before you make your first call.Install PHP
Follow the official PHP instructions to download and install PHP on
macOS,
Windows, or
Debian Linux, or use your favorite package manager to install PHP on any Linux distro.Install Composer
We recommend using Composer, a dependency manager for PHP, as the package manager for your PHP projects.
-
Download the latest version of Composer.
-
Run this command in Terminal to run Composer.
php ~/Downloads/composer.phar --version
-
Make it executable.
cp ~/Downloads/composer.phar /usr/local/bin/composer
sudo chmod +x /usr/local/bin/composer
-
To check whether the path includes /usr/local/bin, type
If the path is different, update it.
export PATH = $PATH:/usr/local/bin
source ~/.bash_profile
-
Download the Composer installer.
curl -sS https://getcomposer.org/installer | php
-
Make the composer.phar file executable.
Note: PHAR (PHP archive) is an archive format for PHP that can be run on the command line.
-
Make Composer globally available for all system users.
mv composer.phar /usr/local/bin/composer
-
Download and run the Windows Installer for Composer.
Note: Allow the installer to make changes to your php.ini file.
-
If you have any terminal windows open, close them all and open a fresh terminal instance.
-
Run the Composer command.
Install Laravel and create a Laravel project
Install Laravel.composer require laravel/installer
mkdir mylaravelapp
cd mylaravelapp
composer create-project laravel/laravel quickstart --prefer-dist
Install the Plivo PHP SDK
To install the most recent release of the Plivo PHP SDK, runcomposer require plivo/plivo-php
<?php
require 'vendor/autoload.php'
Make your first outbound call
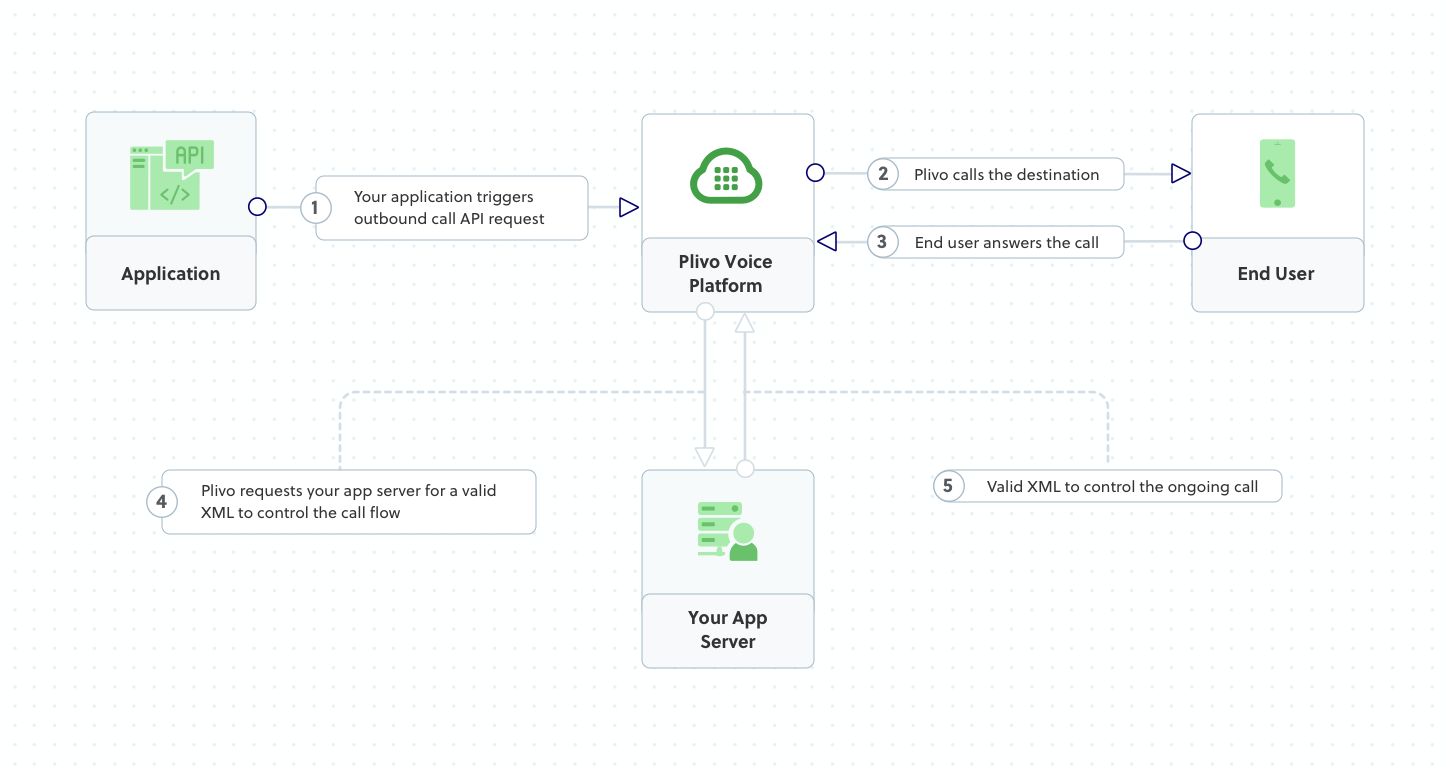
Plivo requests an answer URL when the call is answered (step 4) and expects the file at that address to hold a valid XML response from the application with instructions on how to handle the call. To see how this works, you can use https://s3.amazonaws.com/static.plivo.com/answer.xml as an answer URL to test your first outgoing call. The file contains this XML code:<Response>
<Speak>Congratulations! You've made your first outbound call!</Speak>
</Response>
Create a Laravel controller to handle outbound calls
Change to the project directory and create a Laravel controller to handle outbound calls.php artisan make:controller VoiceController
<?php
namespace App\Http\Controllers;
require '../../vendor/autoload.php';
use Plivo\RestClient;
use Illuminate\Http\Request;

class VoiceController extends Controller
{
    // To make your first outbound call
    public function makeCall()
    {
        $auth_id    = "<auth_id>";
        $auth_token = "<auth_token>";
        $client     = new RestClient($auth_id, $auth_token);
        $response = $client->calls->create('<caller_id>',
        ['<destination_number>'],
        'https://s3.amazonaws.com/static.plivo.com/answer.xml',);
        header('Content-Type: application/json');
        echo json_encode($response);
    }
}
Note: We recommend that you store your credentials in the auth_id and auth_token environment variables to avoid the possibility of accidentally committing them to source control. If you do this, you can initialize the client with no arguments and Plivo will automatically fetch the values from the environment variables. You can use $_ENV or putenv/getenv to store environment variables and retrieve them when initializing the client.
Add a route
Edit routes/web.php and add this line at the end of the file.Route::match(['get', 'post'], '/makecall', 'VoiceController@makeCall');
Note: If you’re using Laravel 8, use the fully qualified class name for your controllers — for example:Route::match(['get', 'post'], '/sendSMS', 'App\Http\Controllers\SMSController@sendSMS');
except array in app/Http/Middleware/VerifyCsrfToken.php. Test
Run your code.Receive your first inbound call
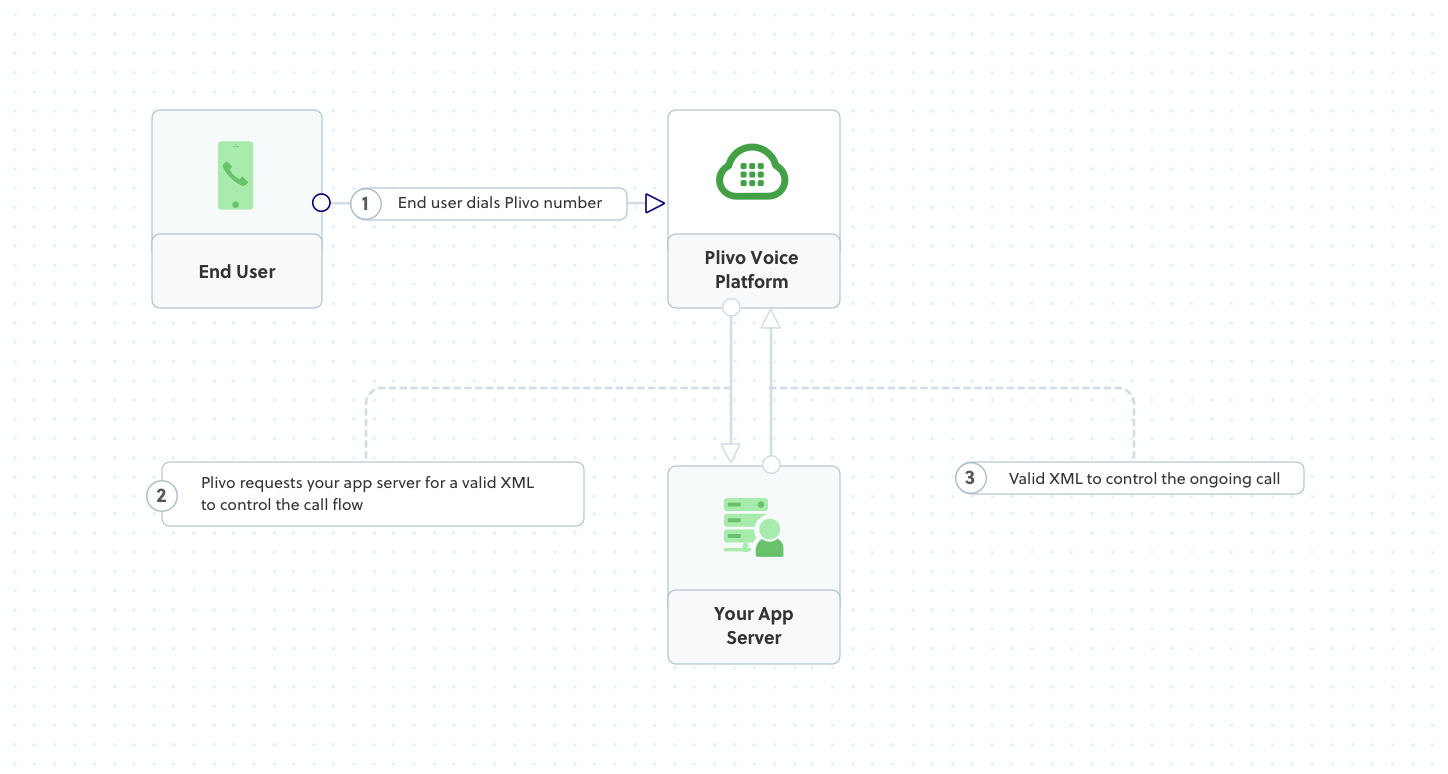
Plivo requests an answer URL when it answers the call (step 2) and expects the file at that address to hold a valid XML response from the application with instructions on how to handle the call. In this example, when an incoming call is received, Plivo’s text-to-speech engine plays a message using the Speak XML element.You must have a voice-enabled Plivo phone number to receive incoming calls; you can rent numbers from the Numbers page of the Plivo console, or by using the Numbers API.Set up a Laravel server to handle incoming calls
Edit app/http/controllers/VoiceController.php and paste into it this code in the VoiceController class after the makeCall function.<?php
namespace App\Http\Controllers;
require '../../vendor/autoload.php';
use Plivo\RestClient;
use Plivo\XML\Response;
use Illuminate\Http\Request;
class VoiceController extends Controller
{
// To make your first outbound call
public function makeCall()
{
.......
}
// Generate a Speak XML document with the details of the text to play on the call
public function receiveCall()
{
$response = new Response();
$speak_body = "Hello, you just received your first call";
$response->addSpeak($speak_body);
Header('Content-type: text/xml');
echo $response->toXML();
}
}
Add a route
Edit routes/web.php and add this line at the end of the file.Route::match(['get', 'post'], '/receivecall', 'VoiceController@receiveCall');
Expose your local server to the internet
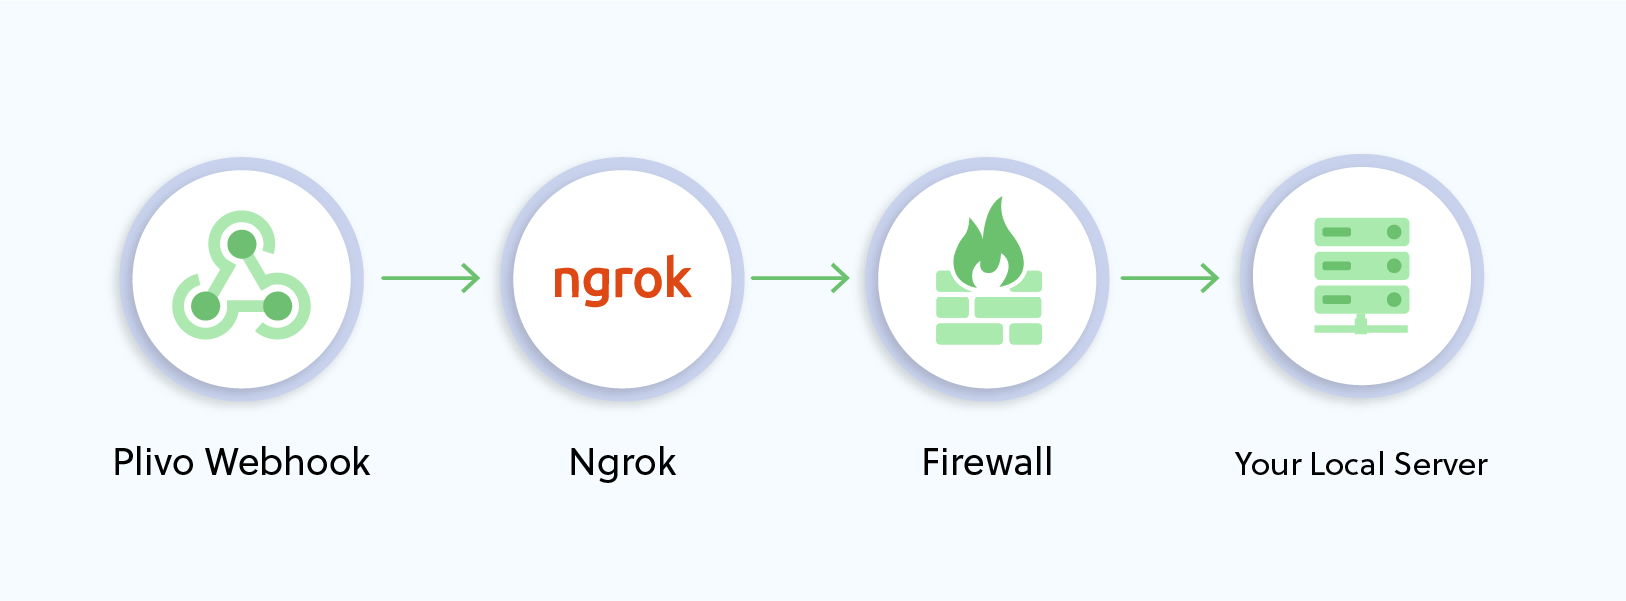
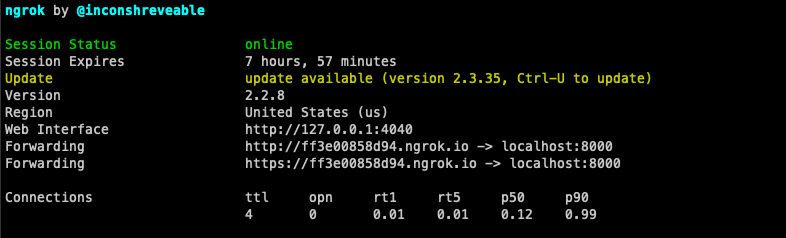
To receive incoming calls, your local server must connect with Plivo API services. For that, we recommend using ngrok, which exposes local servers running behind NATs and firewalls to the public internet over secure tunnels. Using ngrok, you can set webhooks that can talk to the Plivo server.Install ngrok and run it on the command line, specifying the port that hosts the application on which you want to receive calls (80 in this case):This starts the ngrok server on your local server. Ngrok will display a forwarding link that you can use as a webhook to access your local server over the public network.You can check the app in action at https://3b3e783f.ngrok.io/receivecall and check the XML response.Create a Plivo application to receive calls
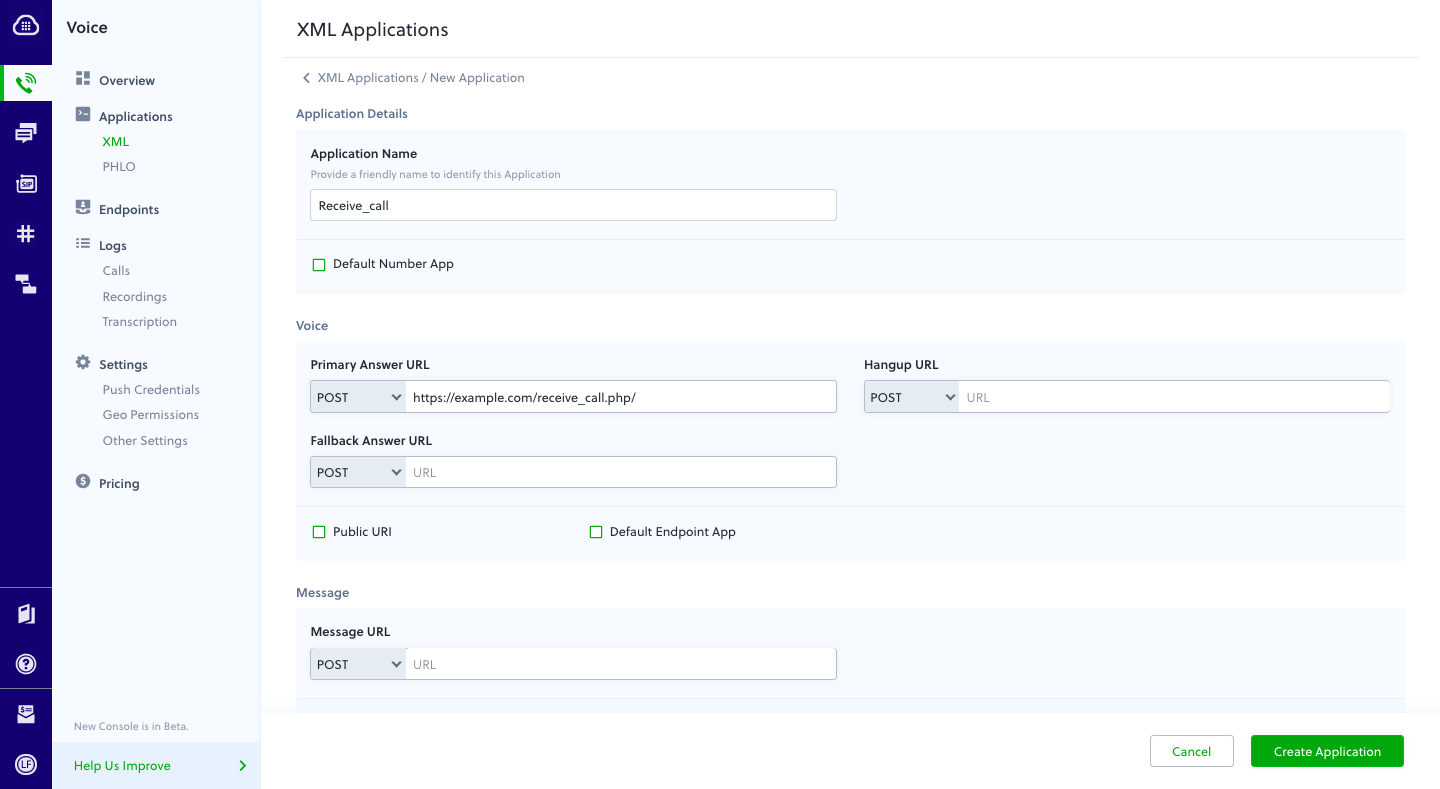
Associate the controller you created with Plivo by creating a Plivo application. Visit Voice > Applications and click Add New Application. You can also use Plivo’s Application API.Give your application a name — we called ours Receive_call. Enter the server URL you want to use (for example https://<yourdomain>.com/receivecall/) in the Primary Answer URL field and set the method to POST. Click Create Application to save your application.Assign a Plivo number to your application
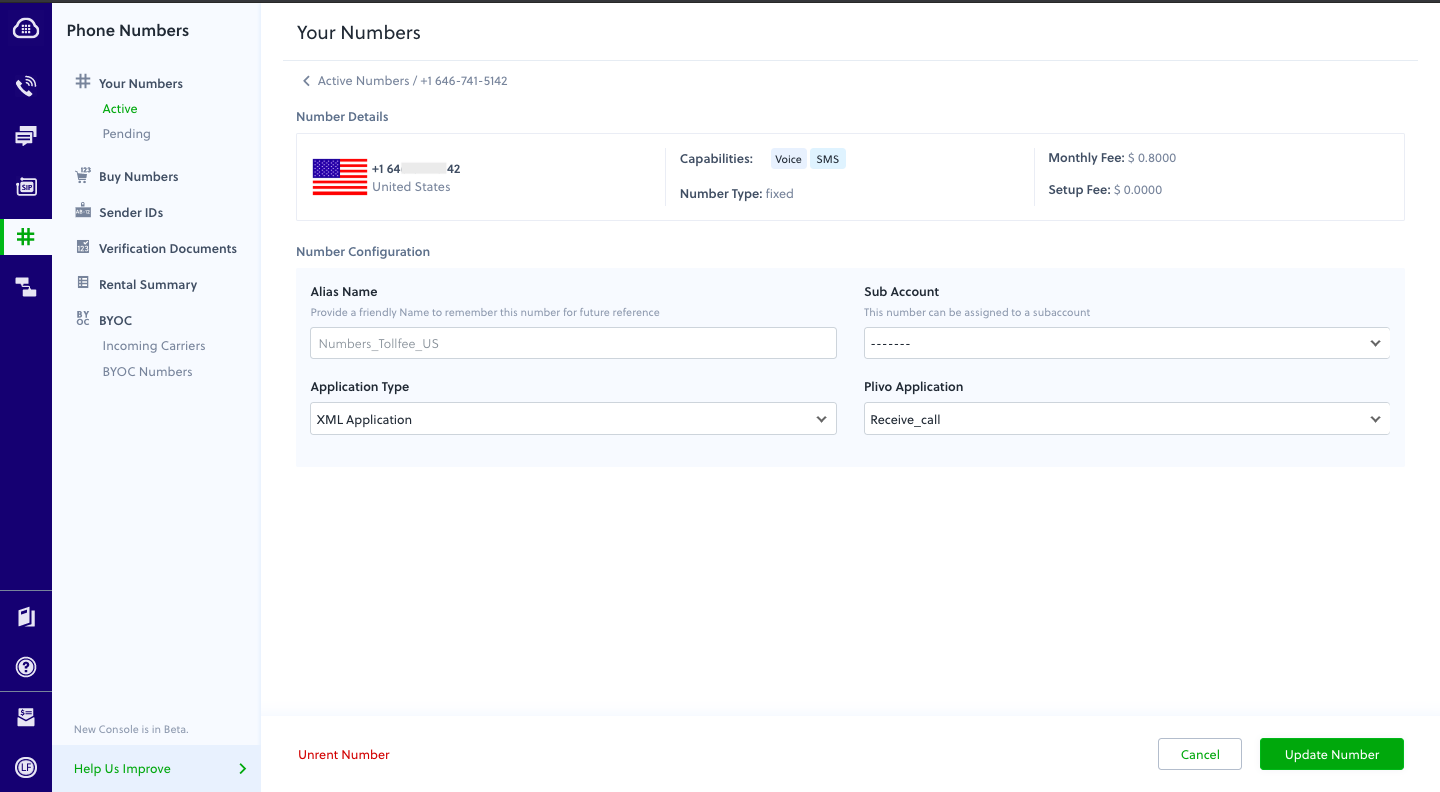
Navigate to the Numbers page and select the phone number you want to use for this application.From the Application Type drop-down, select XML Application.From the Plivo Application drop-down, select Receive Call (the name we gave the application).Click Update Number to save.Test
Make a call to your Plivo number using any phone.Forward an incoming call
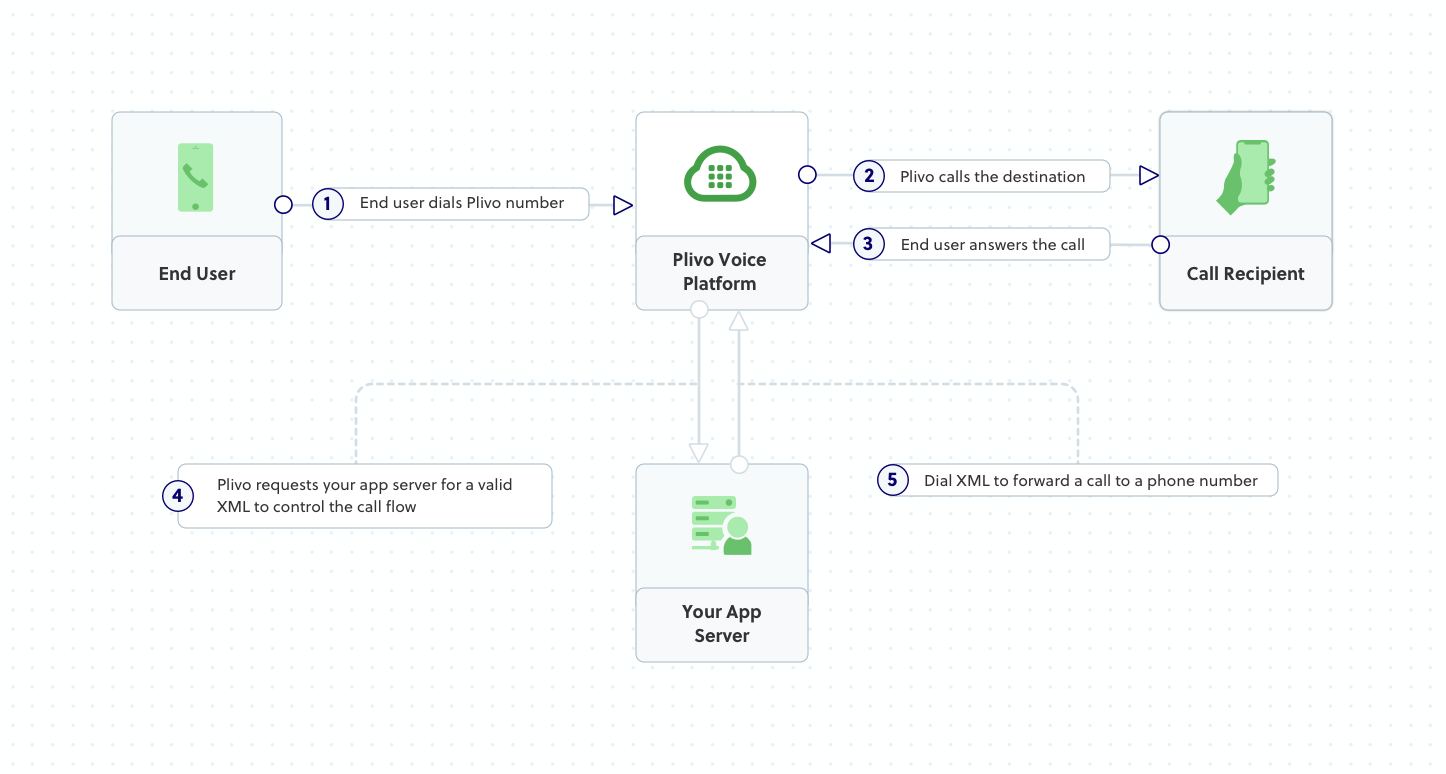
Plivo requests an answer URL when the call is answered (step 4) and expects the file at that address to hold a valid XML response from the application with instructions on how to handle the call. In this example, when an incoming call is received, Plivo forwards the call using the Dial XML element.You must have a voice-enabled Plivo phone number to receive incoming calls; you can rent numbers from the Numbers page of the Plivo console, or by using the Numbers API.Update the Laravel controller
Edit app/http/controllers/VoiceController.php and paste into it this code in the VoiceController class after the receiveCall function.<?php
namespace App\Http\Controllers;
require '../../vendor/autoload.php';
use Plivo\RestClient;
use Plivo\XML\Response;
use Illuminate\Http\Request;
class VoiceController extends Controller
{
// To make your first outbound call
public function makeCall()
{
........
}
// Speak XML to handle you first incoming call
public function receiveCall()
{
..........
}
// Dial XML to forward the incoming call
public function forwardCall()
{
$response = new Response();
$params = array(
'action' => "https://<yourdomain>.com/dial_status/",
'method' => "POST",
'redirect' => "true"
);
$dial = $response->addDial($params);
$number = "<destination_number>";
$dial->addNumber($number);
Header('Content-type: text/xml');
echo $response->toXML();
}
}
Add a route
Edit routes/web.php and add this line at the end of the file.Route::match(['get', 'post'], '/forwardcall', 'VoiceController@forwardCall');
Create a Plivo application to forward calls
Associate the Laravel controller you created with Plivo by creating a Plivo application. Visit Voice > Applications in the Plivo console and click on Add New Application, or use Plivo’s Application API.Give your application a name — we called ours Forward Call. Enter the server URL you want to use (for example https://<yourdomain>.com/forward_call/) in the Answer URL field and set the method to POST. Click Create Application to save your application.Assign a Plivo number to your application
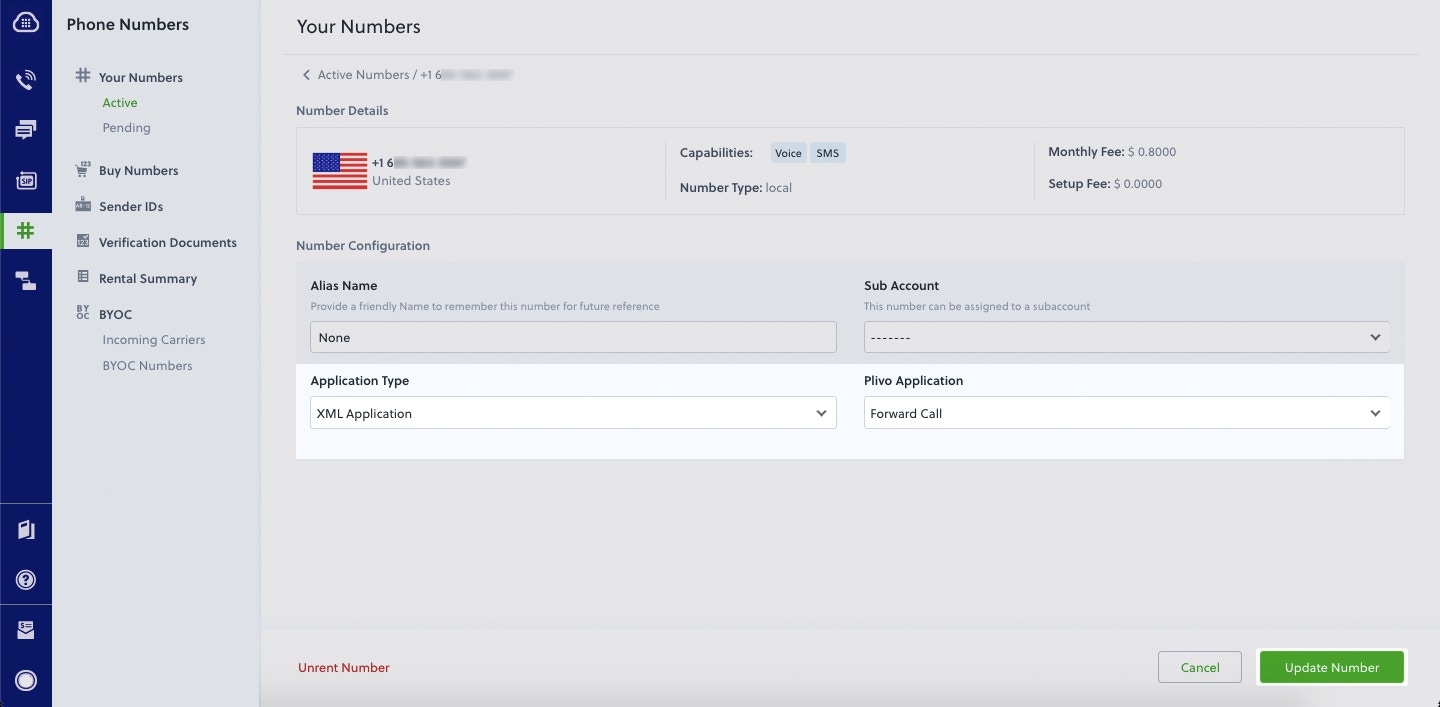
Navigate to the Numbers page and select the phone number you want to use for this application.From the Application Type drop-down, select XML Application.From the Plivo Application drop-down, select Forward Call (the name we gave the application).Click Update Number to save.Test
Make a call to your Plivo number using any phone. Plivo will send a request to the answer URL you provided requesting an XML response and then forward the call according to the instructions in the XML document the server provides.More use cases
We illustrate more than 20 use cases with code for both API/XML and PHLO on our documentation pages.